Introduction
Thank you very much for choosing our theme. We truly appreciate and really hope that you'll enjoy our theme!If you like this theme, Please support us by rating us 5 stars (How to rate?)
Space ‐ Minimalist, Clean WooCommerce Theme. It comes with a lot of great features that would take you months to develop. It is fully responsive, it looks stunning on all types of screens and devices, flexible layout easy to change header layout, footer layout, product detail page layout, category page layout. Including easy to set up for MailChimp, Contact Form 7, Instagram Feed, Lookbook, WooCommerce Email Transaction and Product Colour Swatch, Product Colours Swatch Gallery Images, Currency and built multi language website with Poly Lang
Theme features
- Responsive Design
- Retina Ready
- Sticky Menu
- Flexible Layout
- Header Layout Options
- Footer Layout Option.
- Category Product Layout Options( Grid, Mansory)
- Lazy Ajax Load for Category Product Layout
- Product Detail Layout Options
- Product Label Badge
- WooCommerce Ready
- WooCommerce Product Color Swatch
- WooCommerce Product Color Swatch Gallery Images
- Product List Color Attribute Filter
- Product List Price Filter
- Quick View Product
- LookBook Plugin
- Custom style WooCommerce email transaction
- Ajax Add to Cart
- Menu's Badge
- Product Search Suggestion
- Built With Bootstrap 3.0
- FontAwesome Icons
- WPML Support
- Woocommerce Newsletter Popup integrate with MailChimp
- Social Icons for Woocommerce email transaction.
- WooCommerce Cloud Zoom.
- One click to import demo.
- Multi Languages webiste with PolyLang
- SiteOrigin Page Builder
- MailChimp For Wordpress
- YITH WooCommerce Newsletter Popup
- Contact Form 7
- Instagram Feed
- Meta Slider
- YITH WooCommerce Wishlist
Credits
- Icons used in the theme: http://fortawesome.github.io/Font-Awesome/
- Mockup iPhone & iPad free include PSD: http://pixeden.com
Image Sources
Note: All images are just used for Preview Purpose Only. They are not part of the theme and NOT included in the final purchase files.
Need Support?
If you have any questions regarding to theme issues, please submit a ticket at http://support.magicaltheme.comTheme Installation
Once you purchase the theme from themeforest, you'll be able to load 2 file type.- All Files and documentation
- Installable Wordpress Theme File
Install theme via Wordpress Dashboard

- Go to 'Appearance > Theme' section
- Click 'Add New' and select the 'Upload' option
- Upload the zip file
- All Done :)
Install theme via FTP
- Access to the file on your server using ftp editor program
- Go to 'wp-content/themes' folder
- Extract the zip file and put the themename-vxx_xx folder there
- Go to 'Wordpress Dashboard > Appearance > Theme' section to activate the theme
- All Done :)
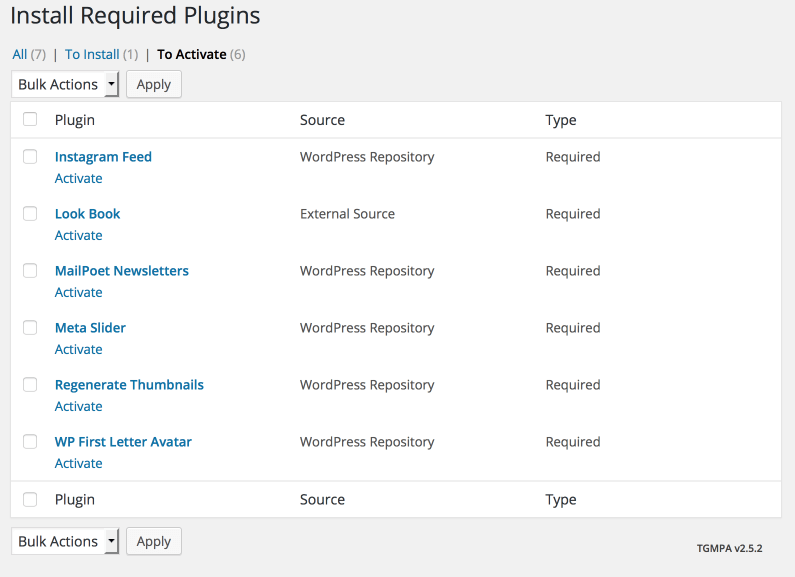
Install Plugins
After you install the theme, there'll be a list of suggested and recommended plugins at the top of the wordpress dashboard.
If you already hide it out, you can go to 'Appearance > Install Plugins' section instead too.
Adding / modify php code
If you don't want to modify the theme files everytime you update the theme, you have to create the child theme to modify the php code for this. You can find the tutorial about how to create the child theme here
Our theme wrap every function with if( !function_exists('some_function') ) command, so if you want to use any function, just declare it in the function.php file of the child theme and it'll overwrite the existing one.
Importing Demo Content
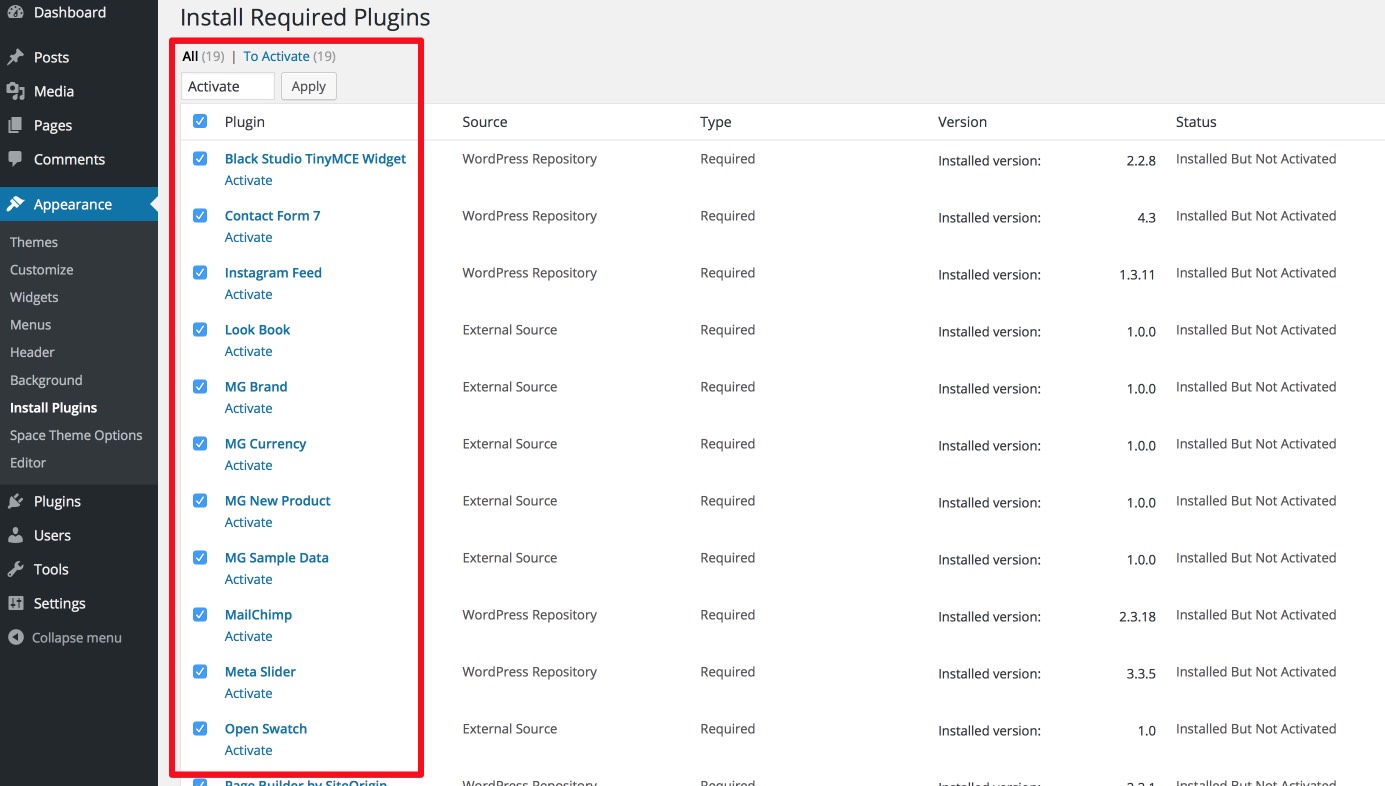
After activating the theme, there'll be suggested plugin listed at the top (if there aren't, you can go to 'Appearance > Install Plugins' section as well ). Try installing and activating these following plugins ( as it effects the importing process ). You can also install all suggested plugins at this step as well.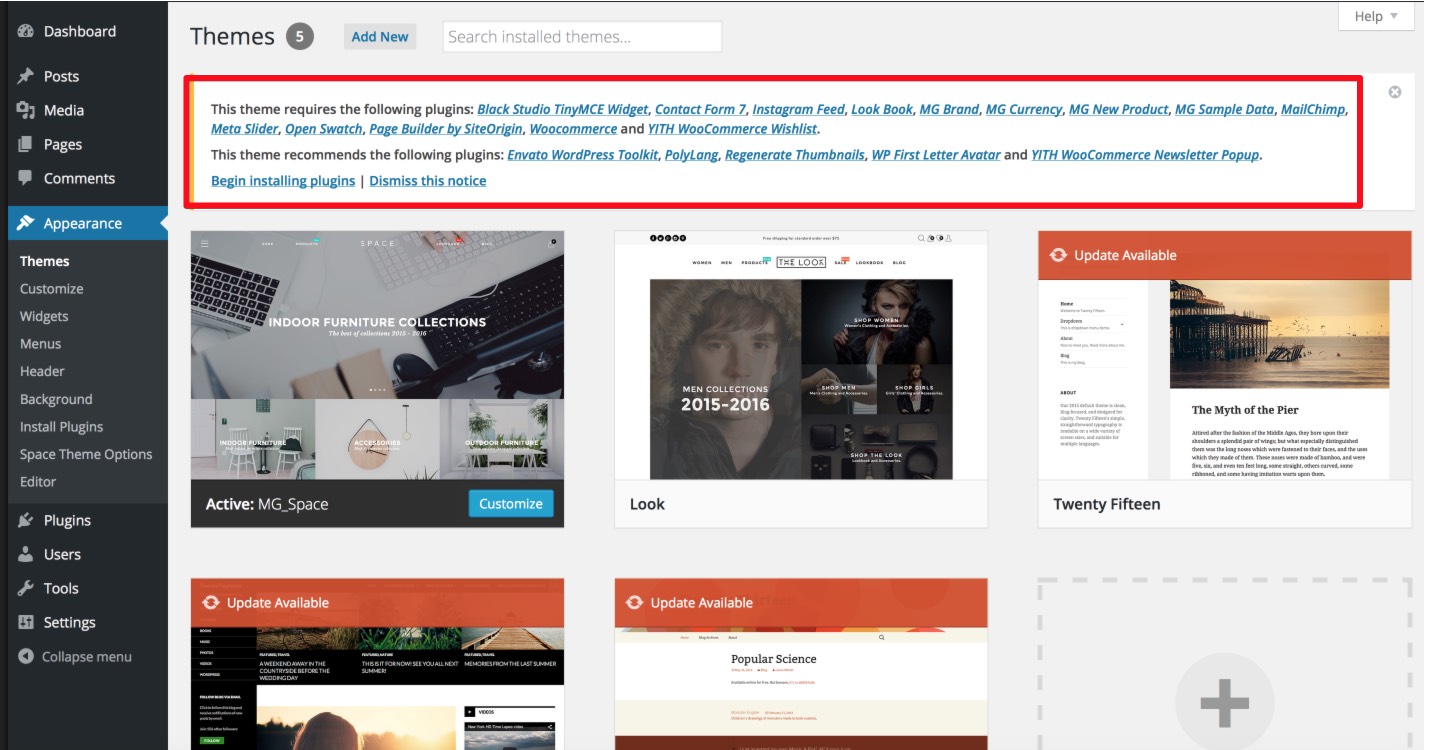
Then, go to 'Appearance > Space Sample Data > Fix Layout > Import Demo Data'
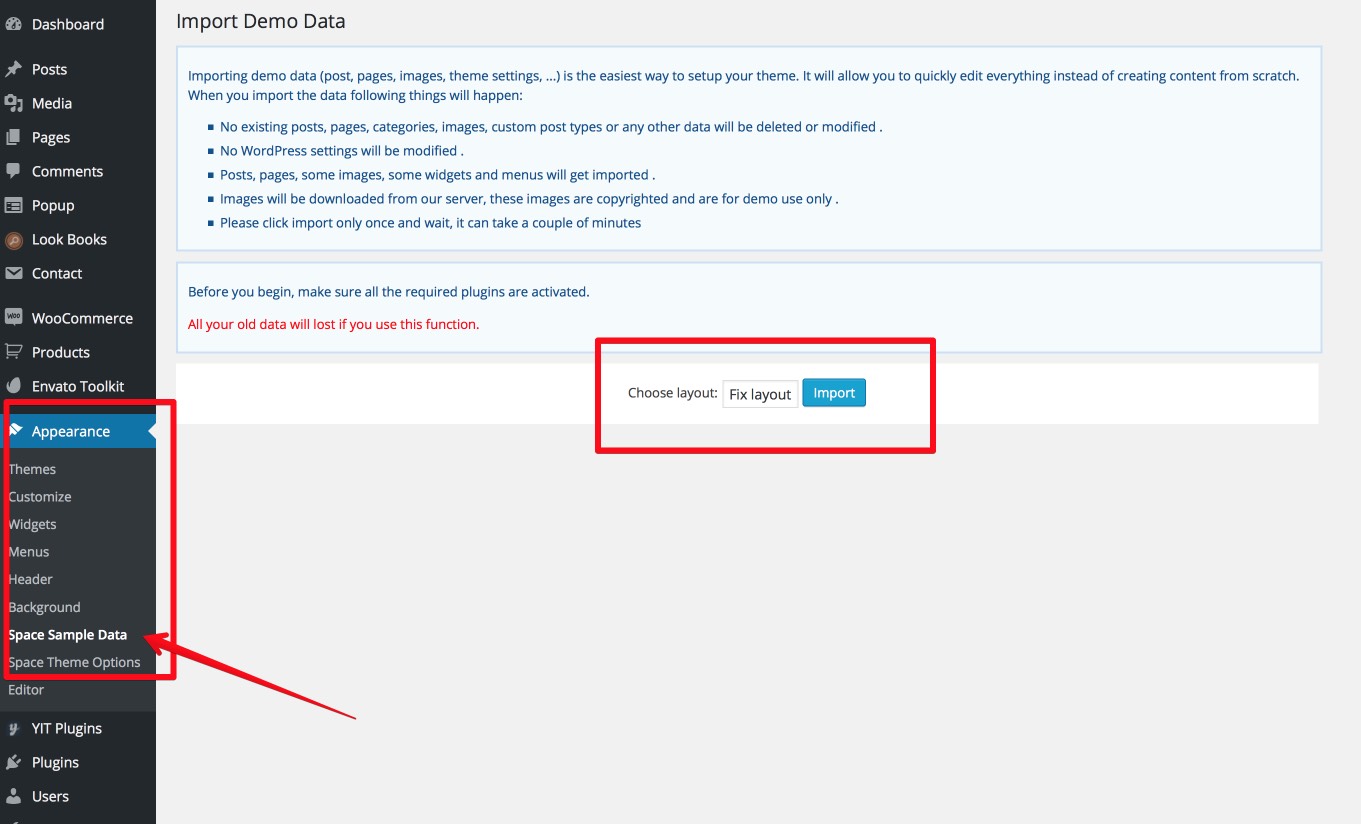
Follow the steps mentioned on the screen, then, you'll get the site like the demo :)
Theme Translation
Try installing the 'Loco Translate' plugin. ( Can be found in 'Plugin > Add New' section ) or You can download plugin at here
- After installed plugin go to 'Loco Translate' section. And Click to "Theme > New Language"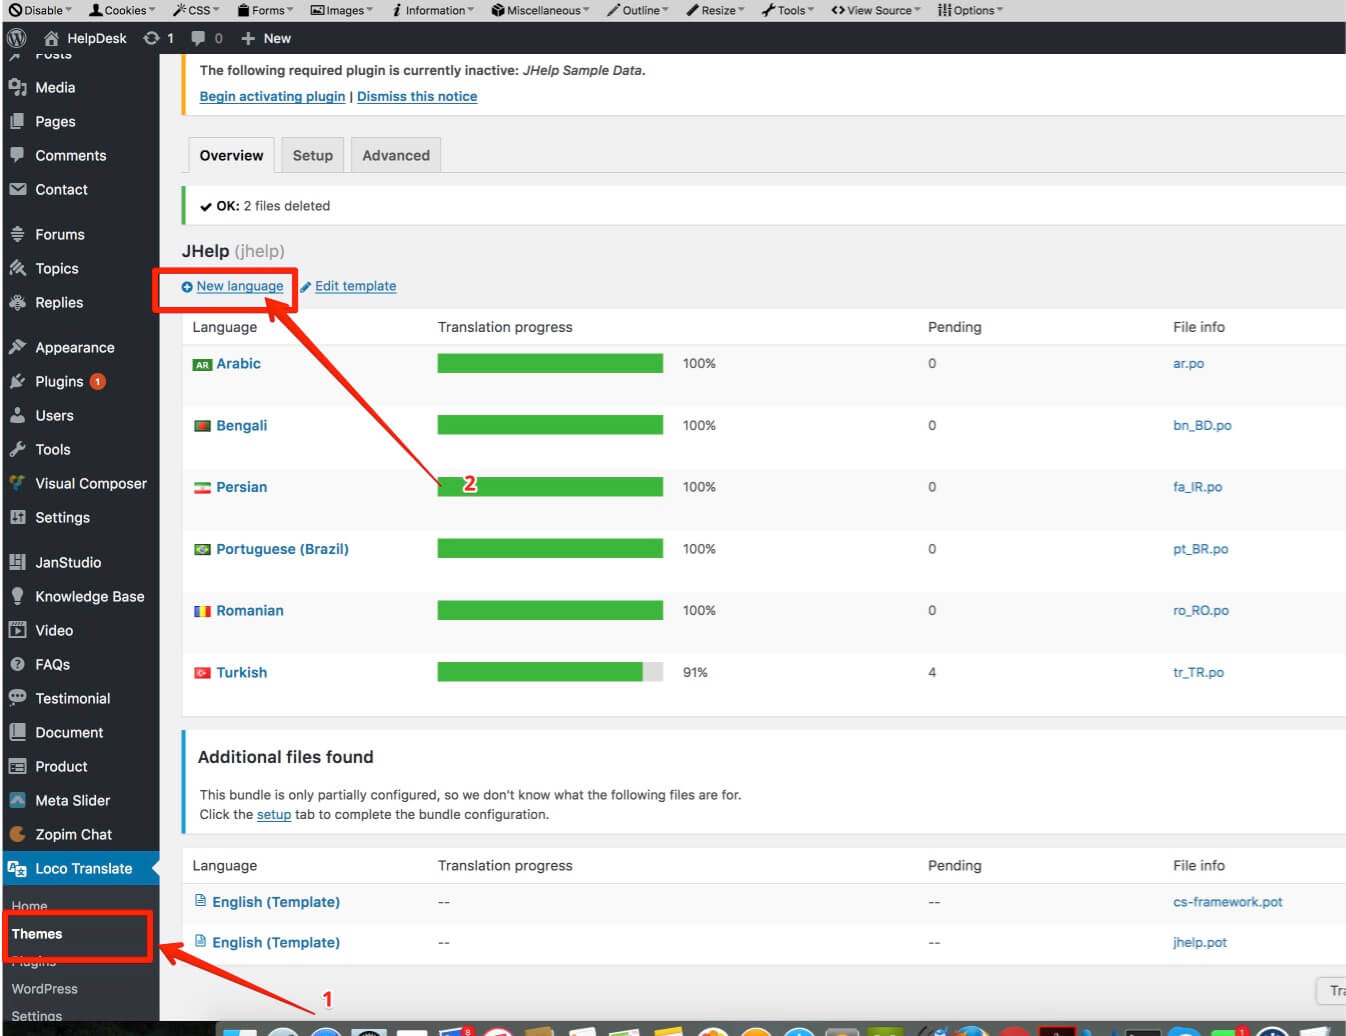
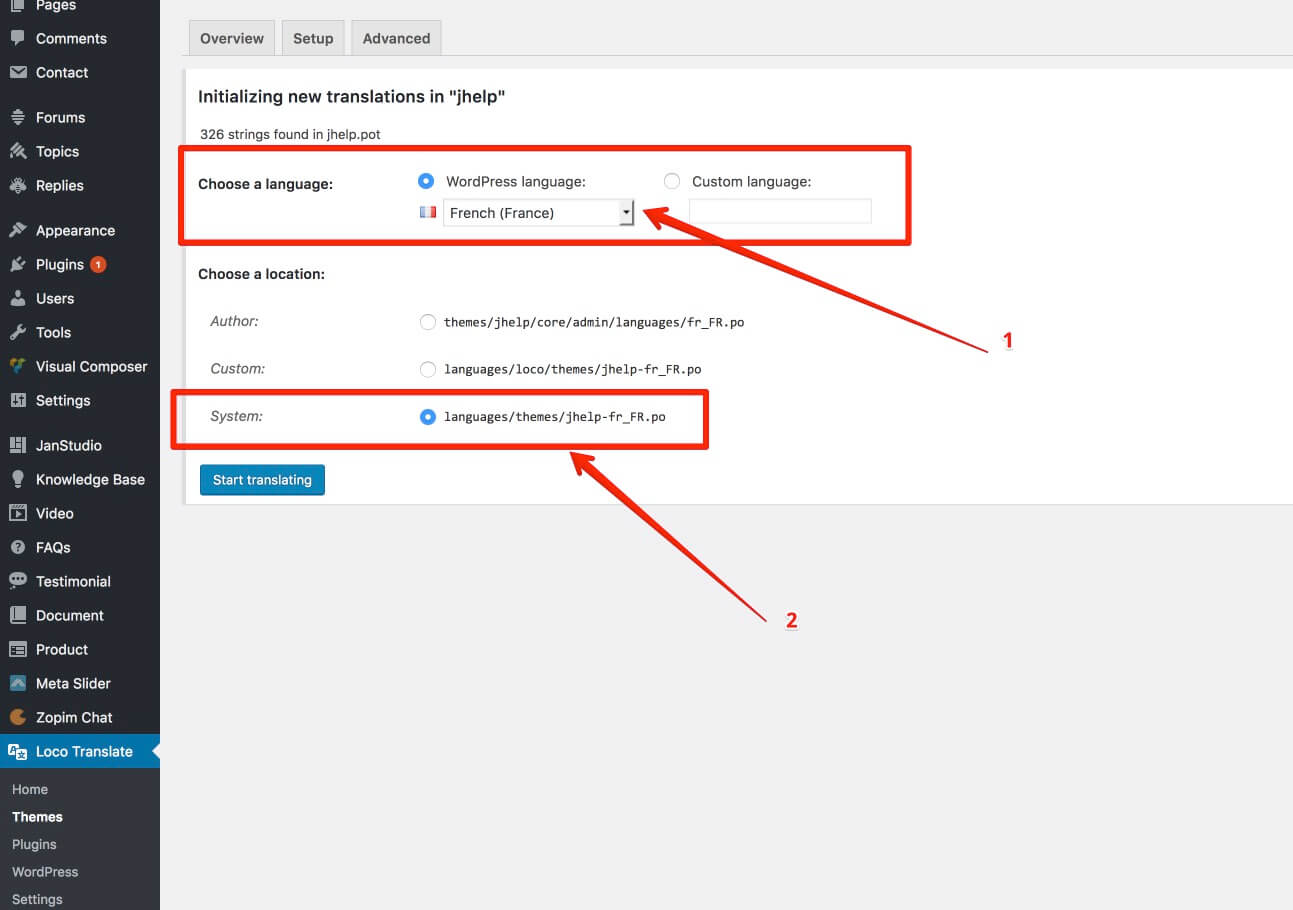
Select your language to translate
Translate texts
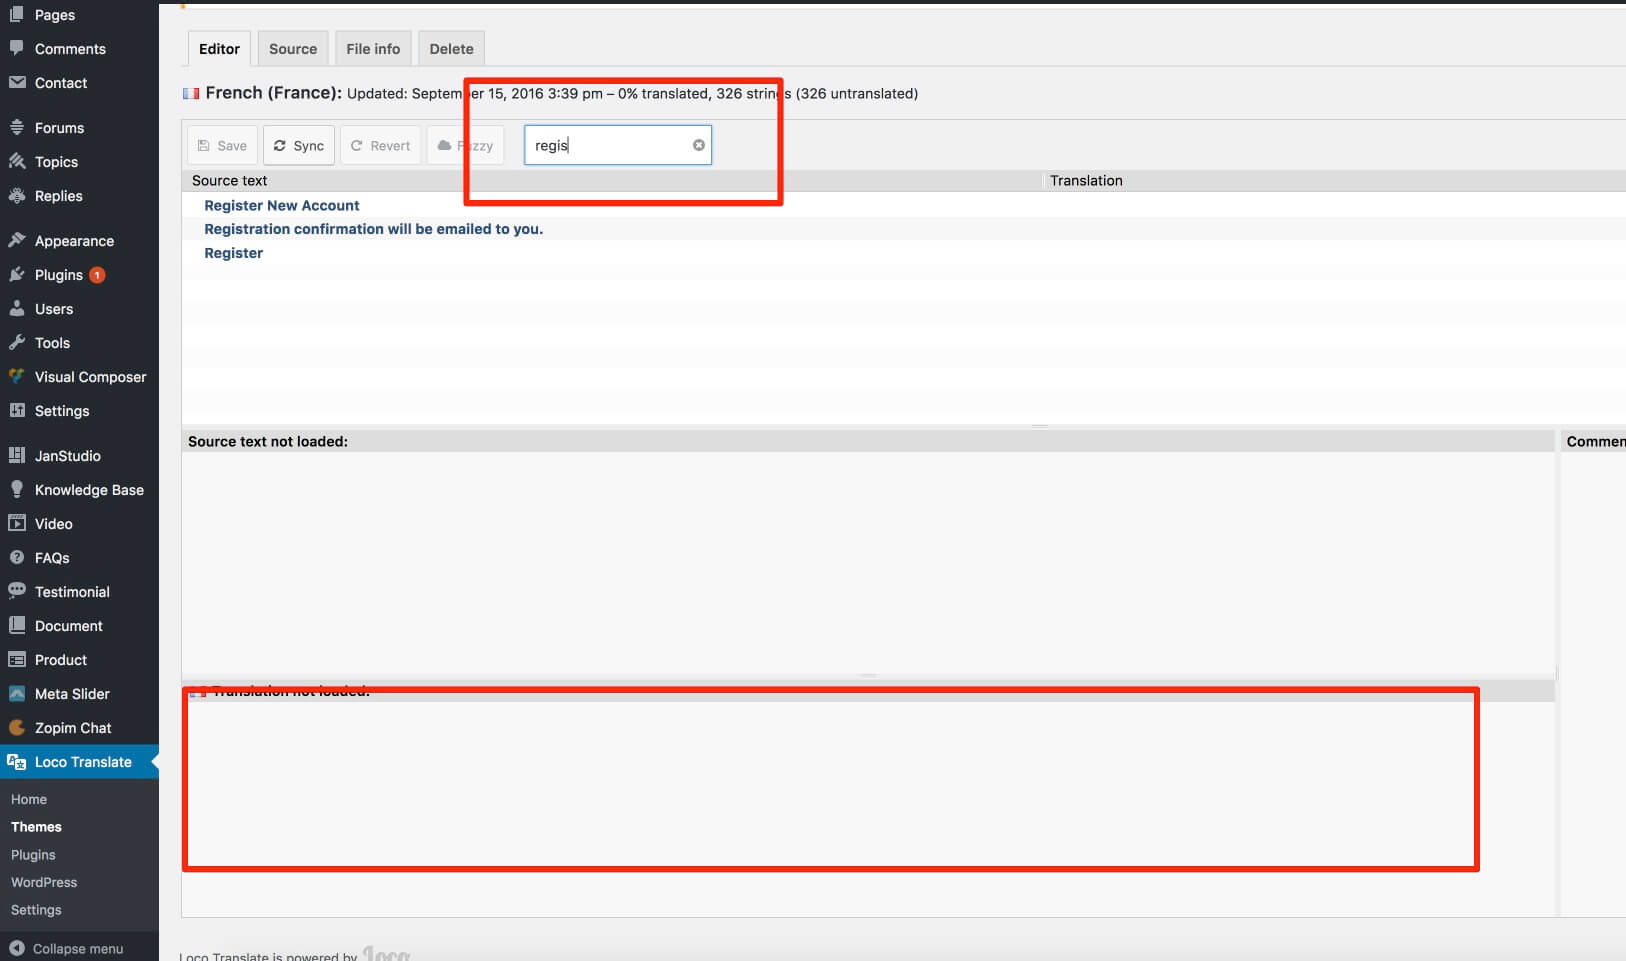
You can learn more about how to localize / translate the wordpress string from here as well
Updating the theme
1. Auto Update
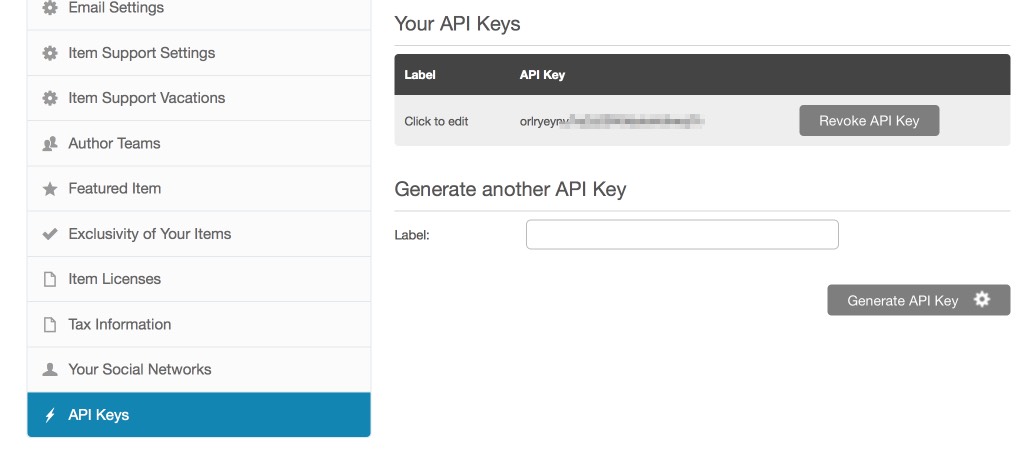
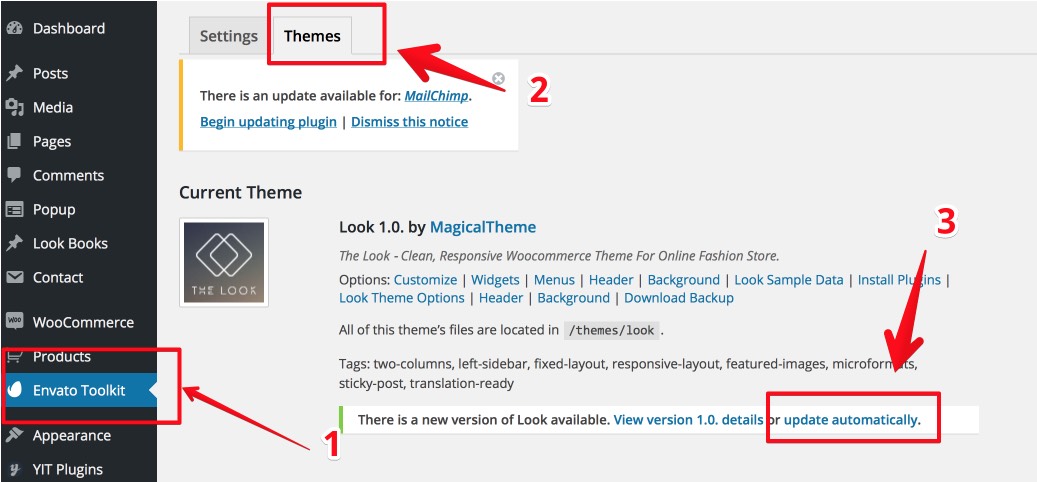
- Go to Dashboard > Envato toolkit > Input your Envato Username and API Keys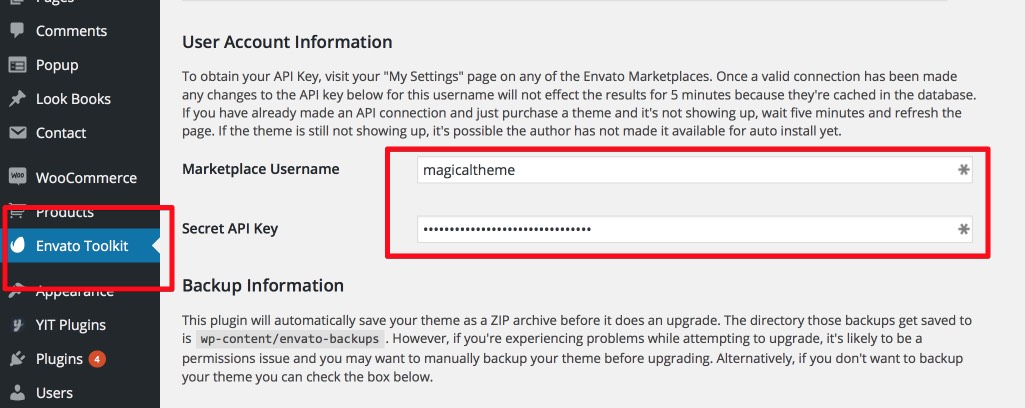
- To get Envato API Key you need login your Envato Account > Settings > API Keys > Generate API Key or copy exist API key
- Open tab "Themes" and Choose Look > Update Automatic
2. Manual Update
Try following this steps for this.- Download the zip file from themeforest again
- Install it to different folder ( or just simply uploading via wordpress dashboard without removing the old one)
- Activating new theme version
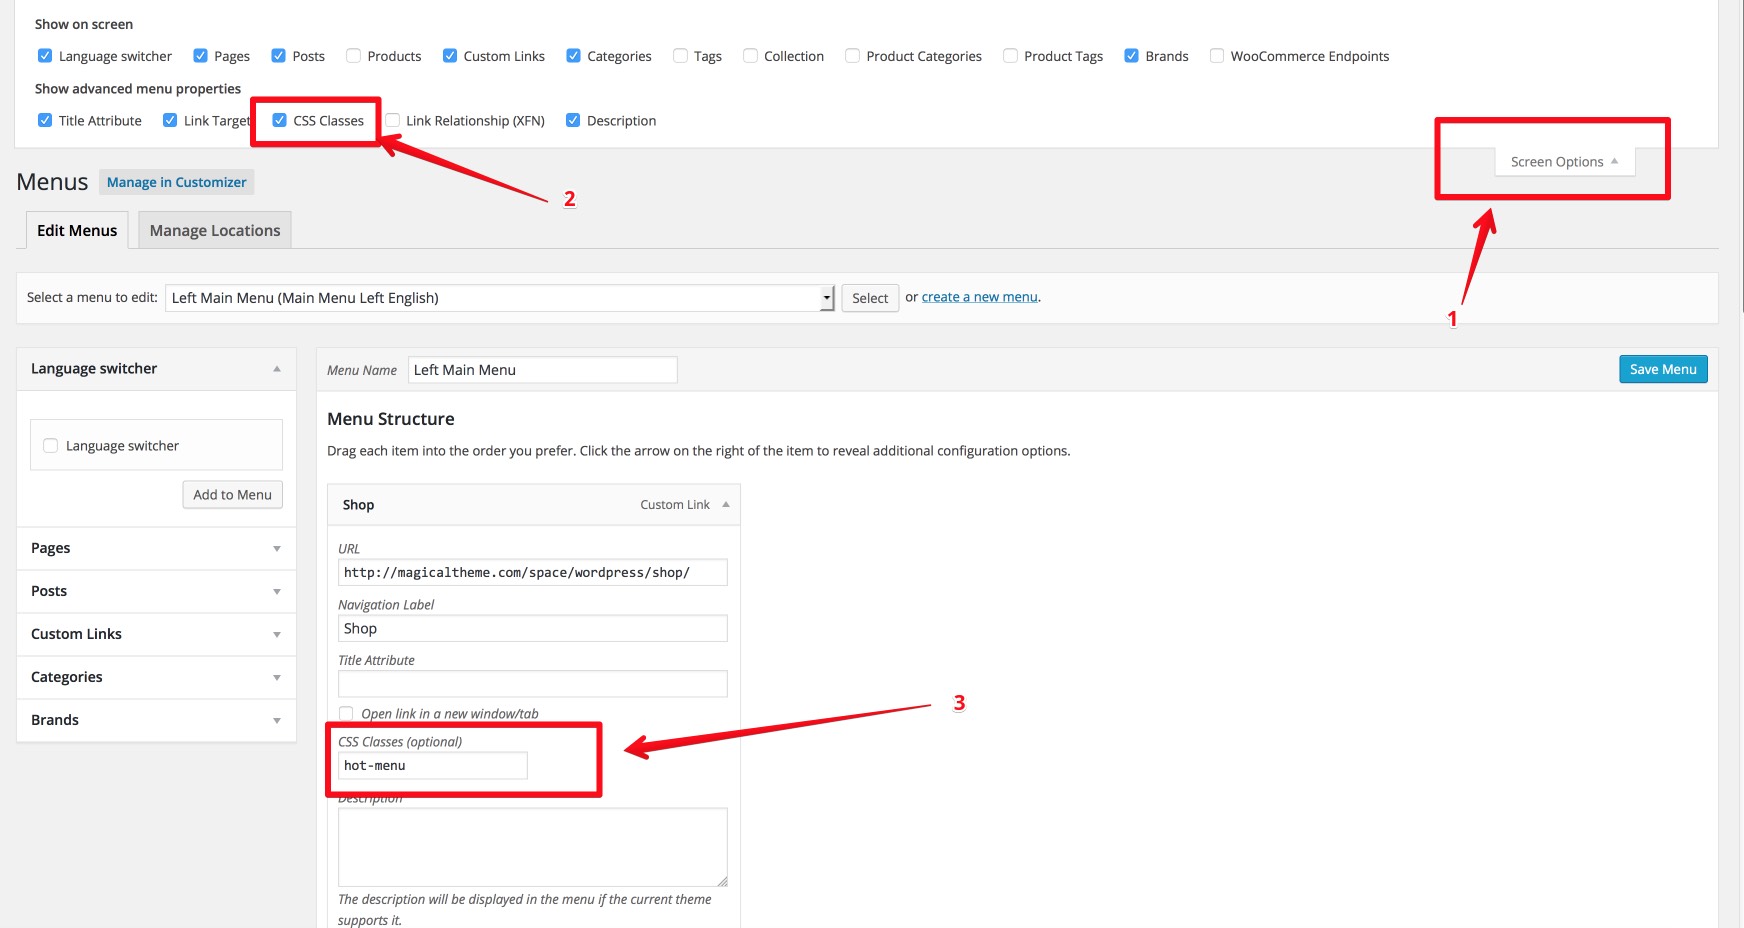
- Set the menu to themes location at the 'Appearance > Menu' section.
- Save the theme option once
- Make sure everything is working properly and you can remove the old theme files out
General Settings
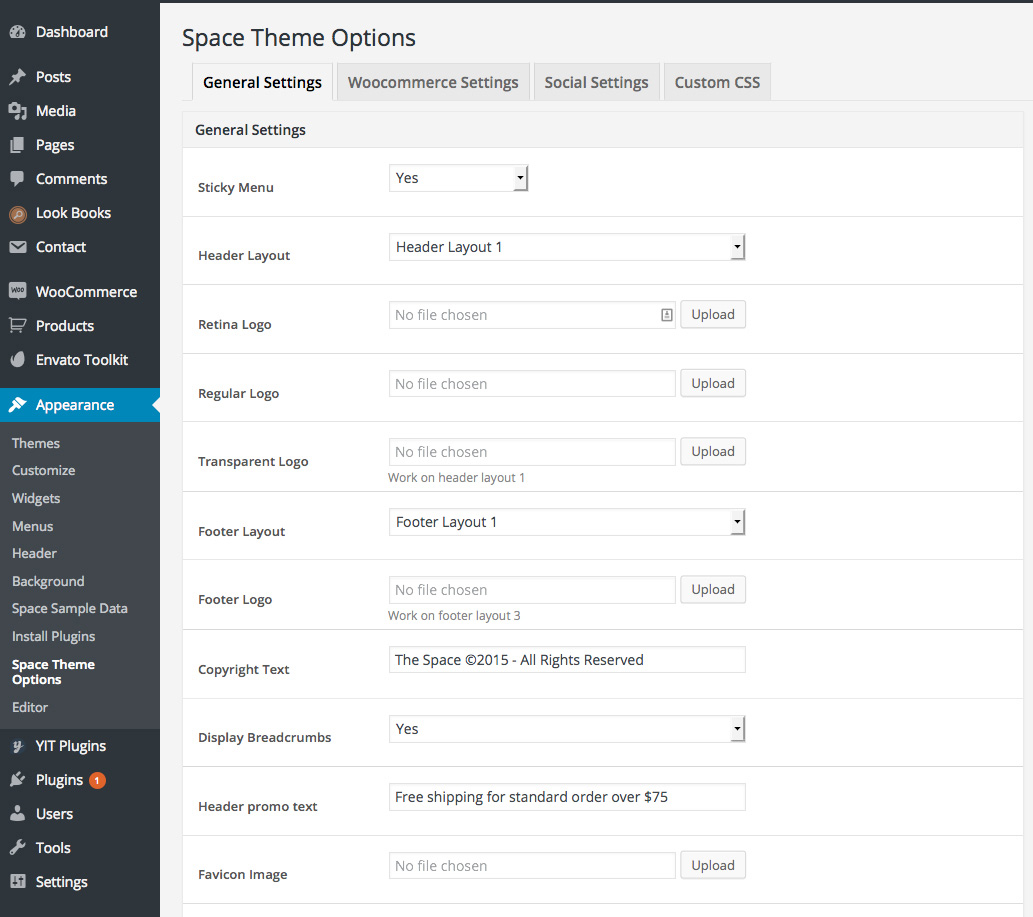
1. Sticky Menu
This to enable or disable sticky menu on top when scroll.2. Header Layout - Only support on Full or Fix Layout
There're 3 options to display layout of header.


3. Logo
There're 3 options at 'Look Theme Options > General Setting > Logo' section.- Regular Logo for normaly display.
- Retina logo for hight resolution display and mobile display
- Transparent logo for transparent header layout 1
4. Footer Layout
There're 3 options to display footer layout.
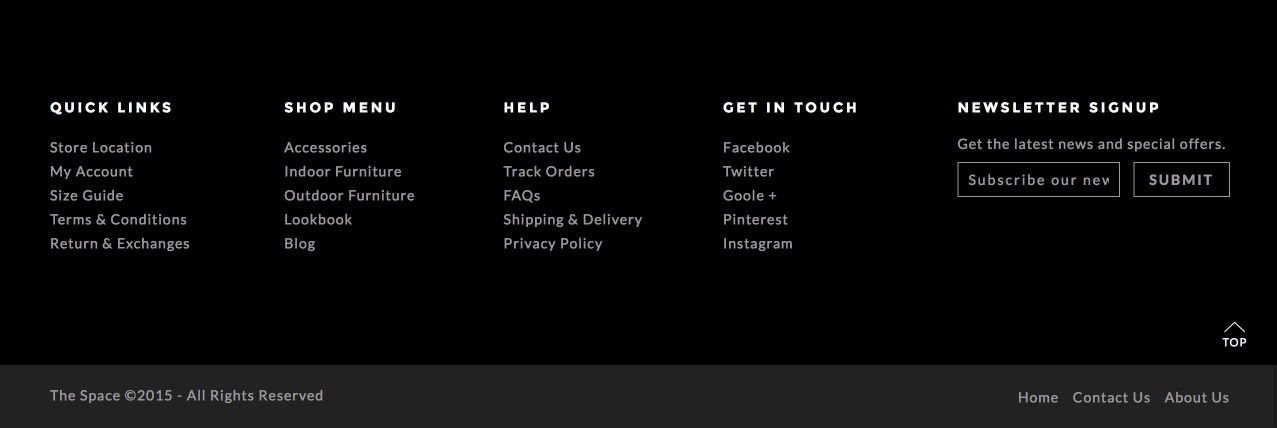
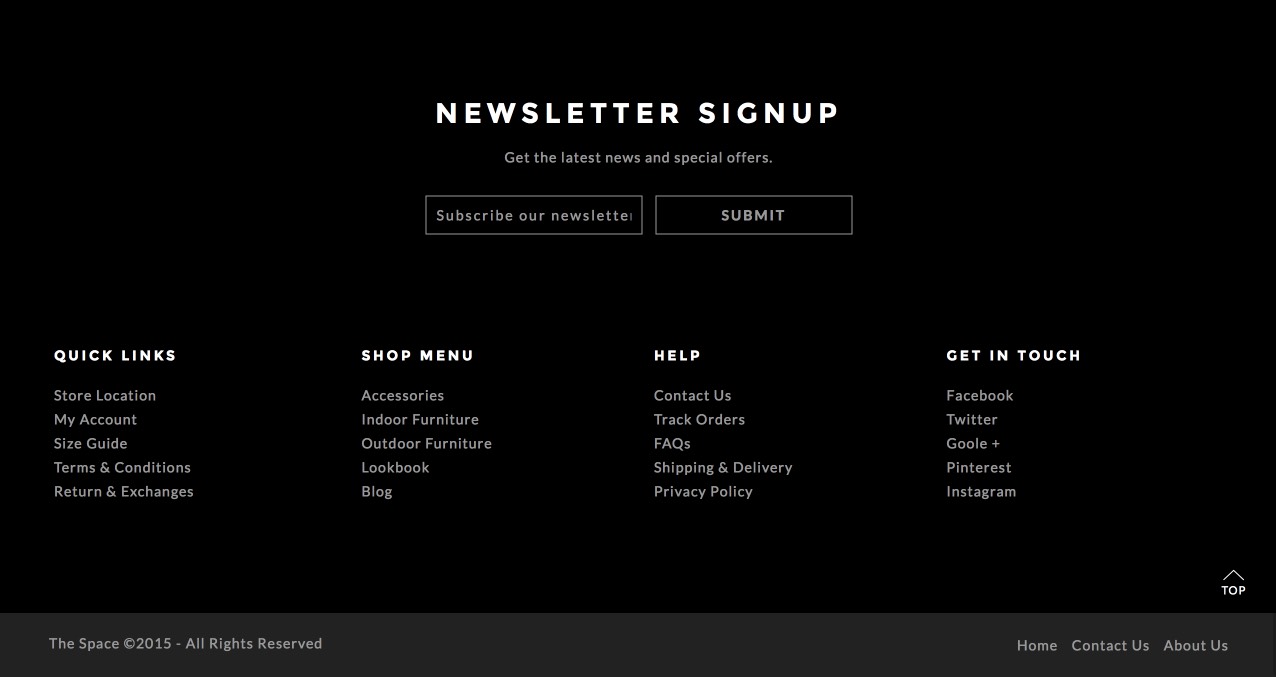

5. Footer logo
The option upload logo for footer layout 36. Footer copyright text
There're an option at the 'Look Theme Options > General Setting > Copyright text' section (You can add your website copyright at the footer)7. Display breadcrumbs
This option to enable/disable breadcrumbs8. Header promo text
You can easy change promo text for your promo campaign9. Favicon image
Choose image to upload change your website favicon with extension (.png or .ico have size 32 x 32px)![]()
10. Lookbook icon image
Choose image to display icon note on the look![]()
Woocommerce Setting
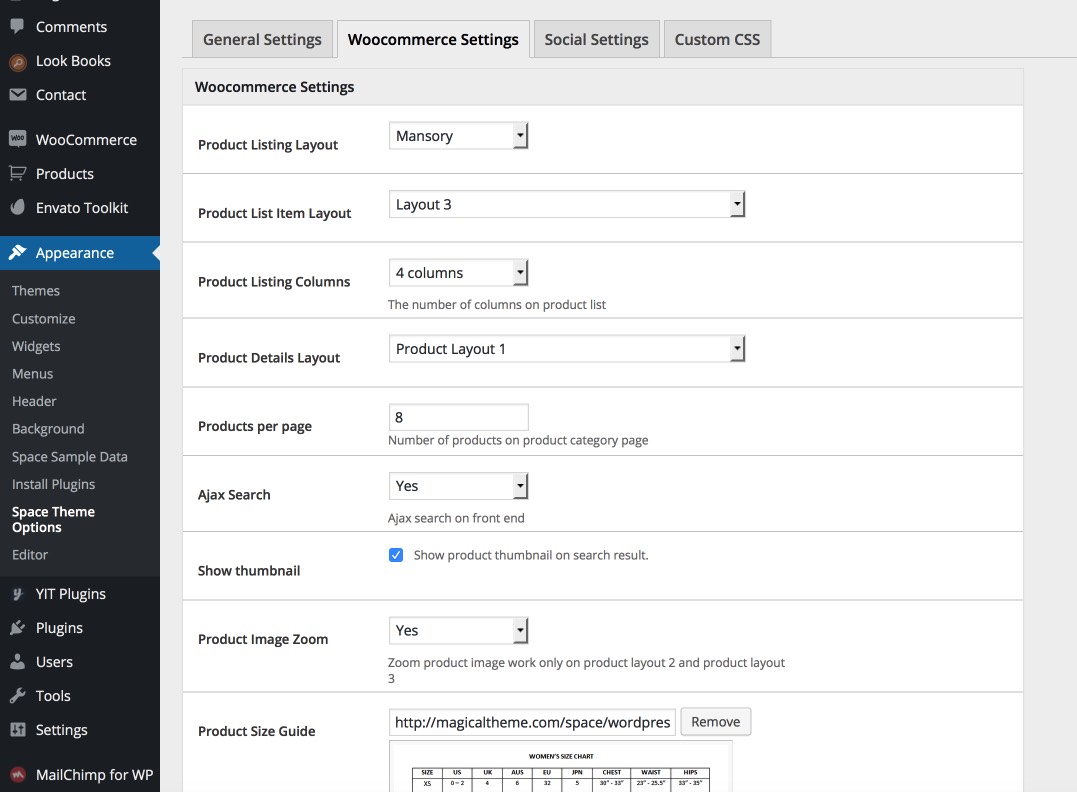
1. Product Listing Layout.
This is global setting for all product listing layout2. Product Listing Item Layout.
This is global setting for product listing layout3. Product Listing Column
You can easy config number of product per row on product listing.4. Product Detail Layout
There're 3 option to display product detail layout:5. Product per page
This option for display number product on product listing page.6. Enable Ajax Search and thumbnail image in ajax search
7. Enable Cloud Zoom in Product Detail page
8. Size Guide
You can change image of size guide or disable size guide by remove default image.Custom CSS
You can overwrite css style of theme by using custom css code.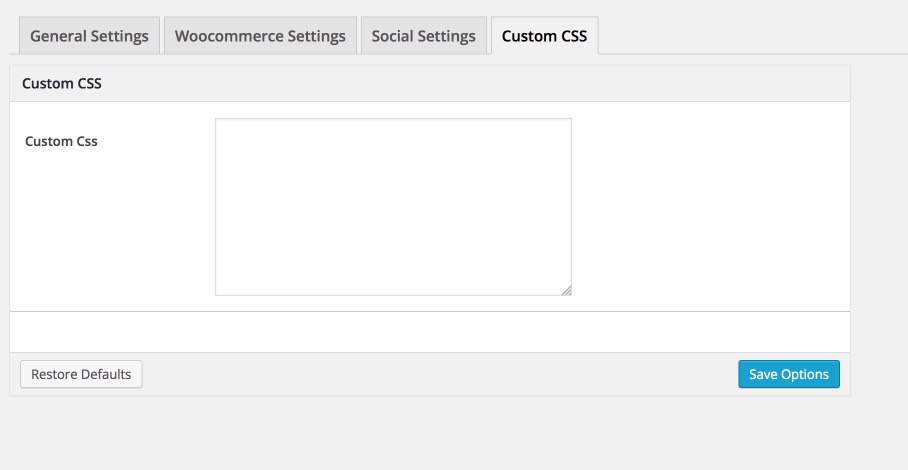
Homepage Option
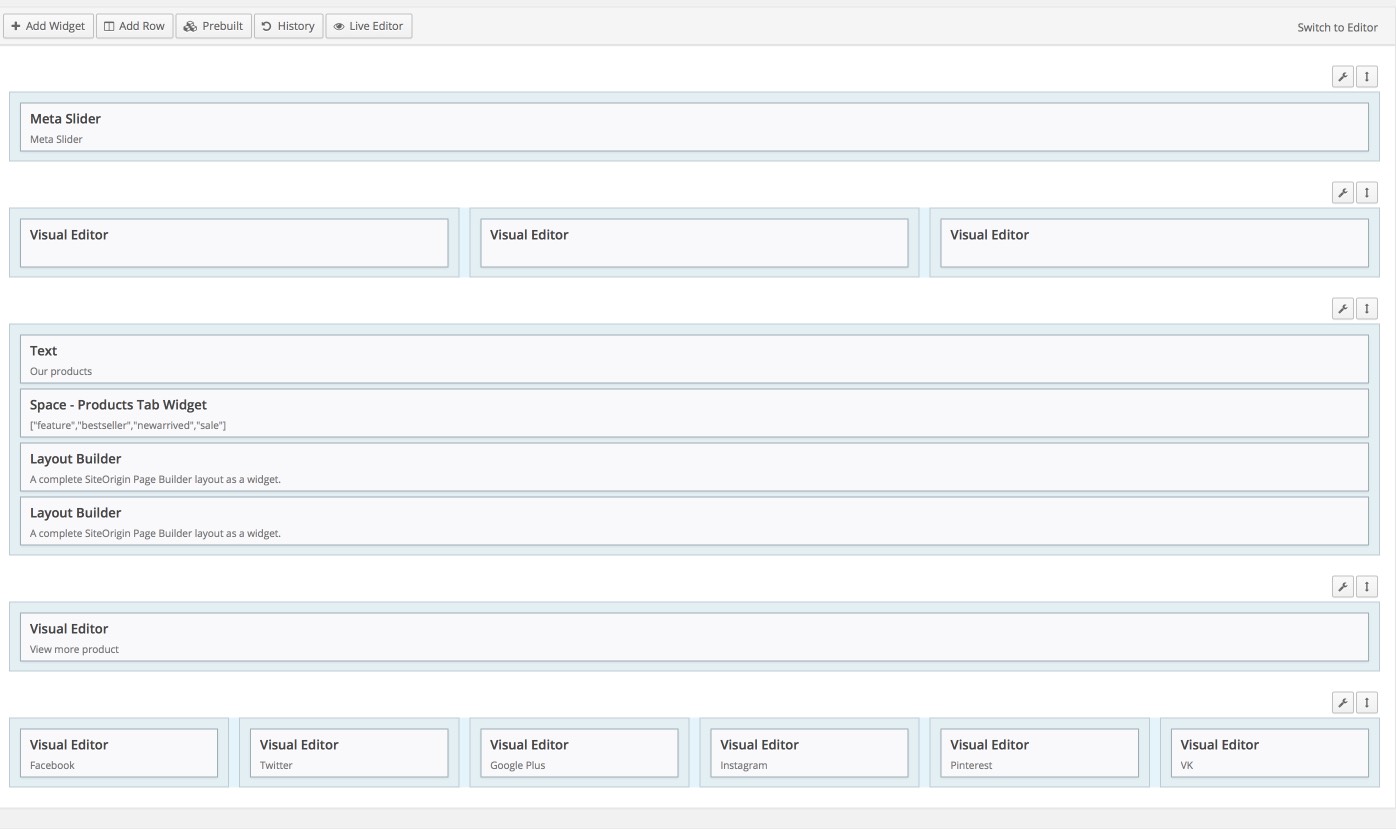
Our theme support display different header/footer with other page and this option only support for page set as frontpage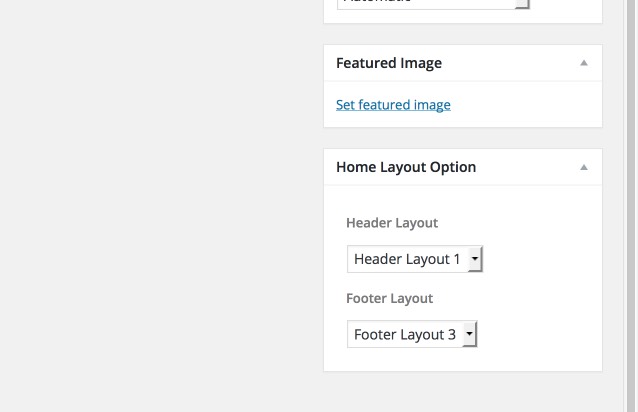
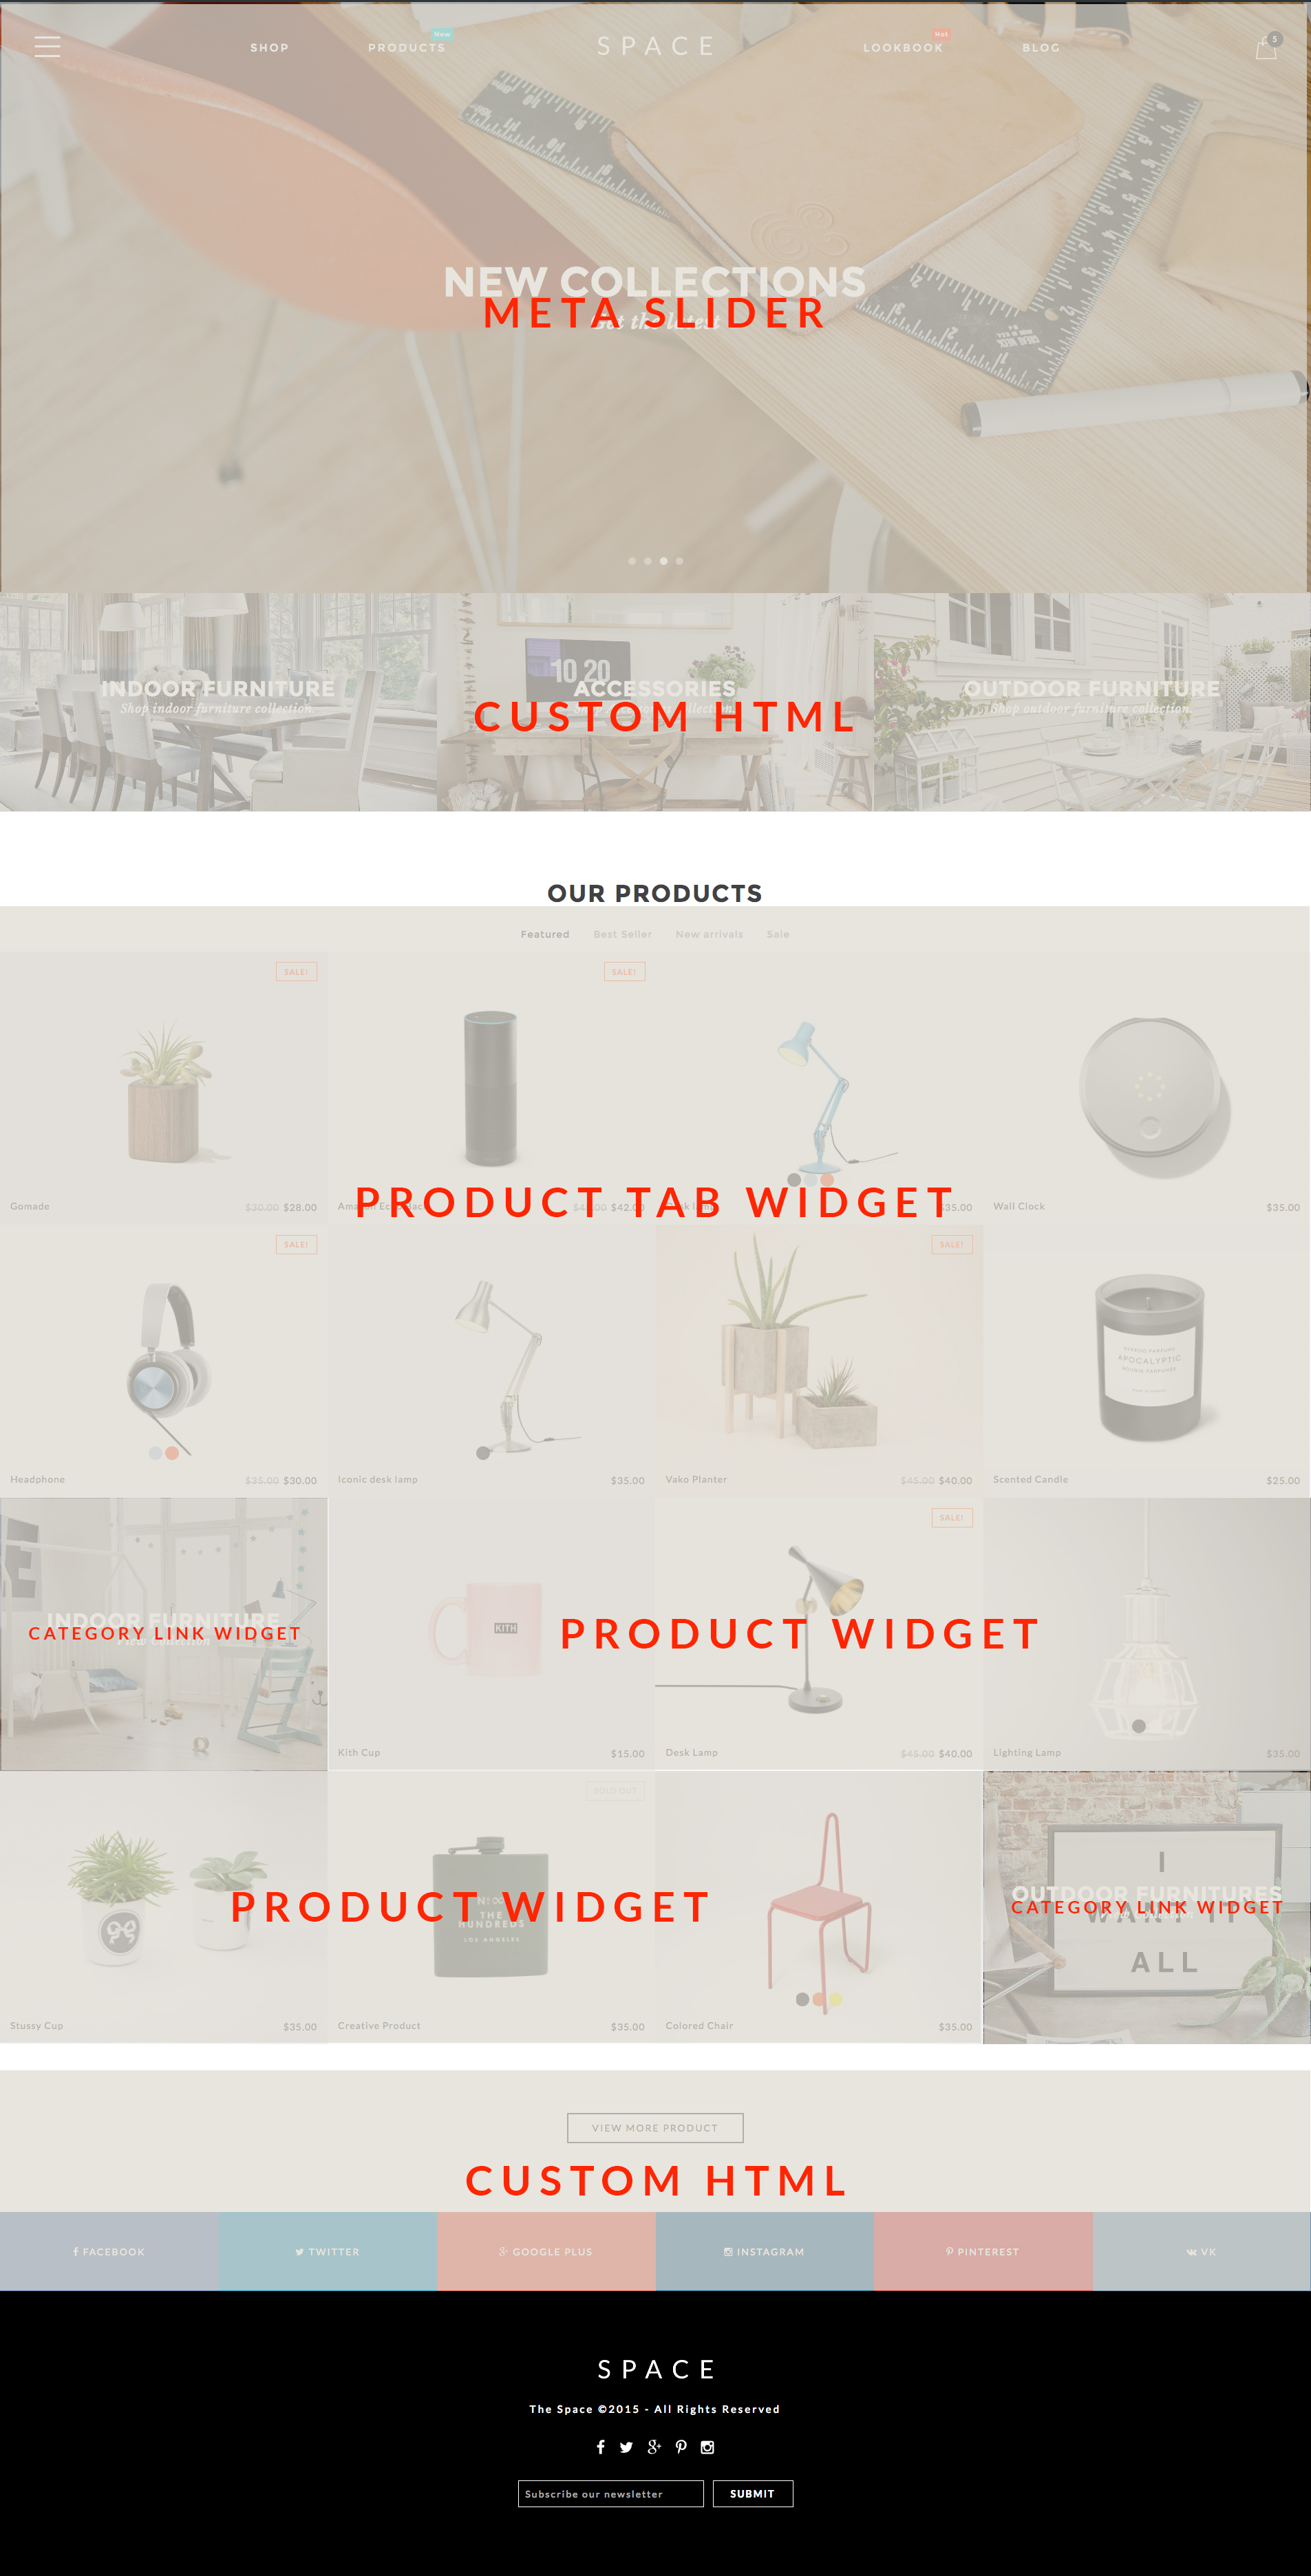
Space Category Link Widget
You can display image link to cateogry product by using widget, you can choose link to WooCommerce Product Category or add Custom Link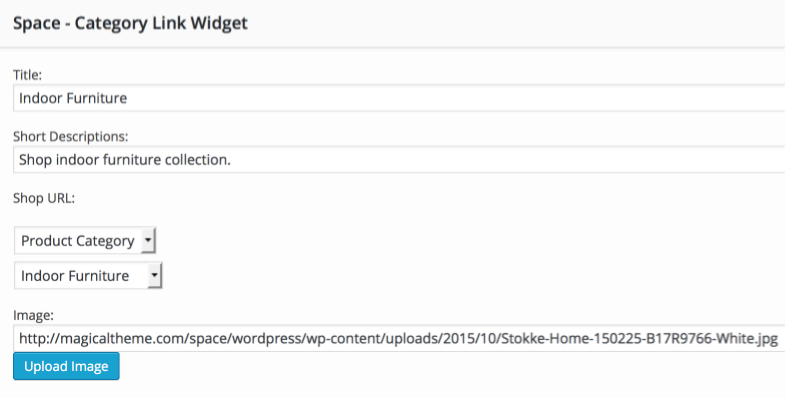
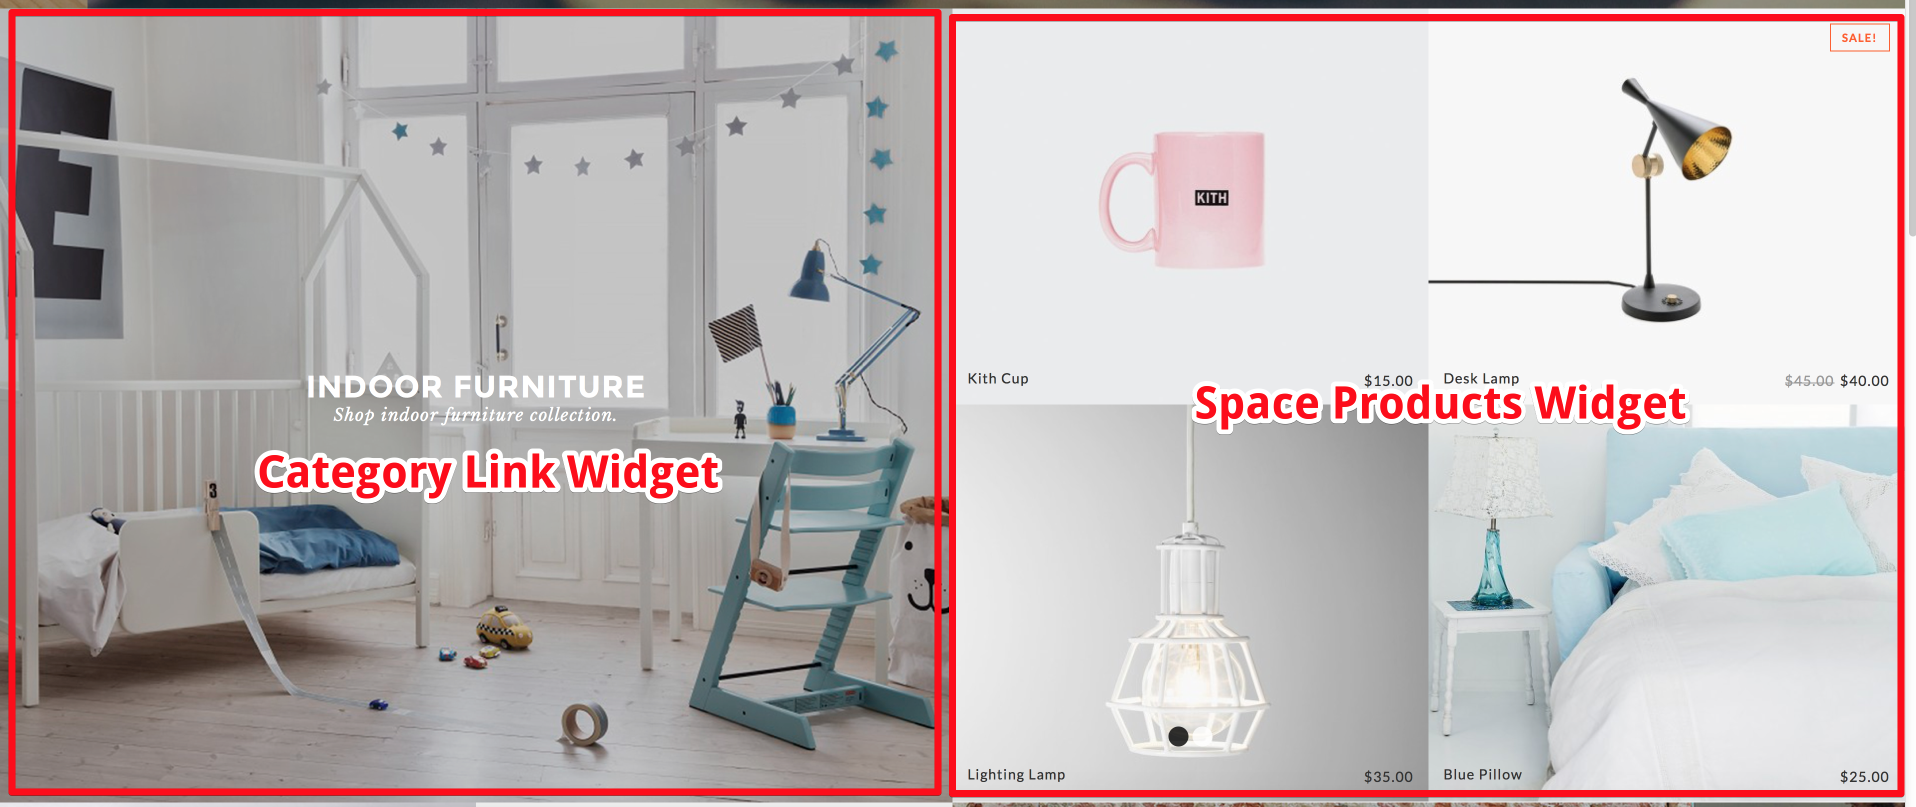
Space Product Widget
You can setup number of column, number of product display and category of product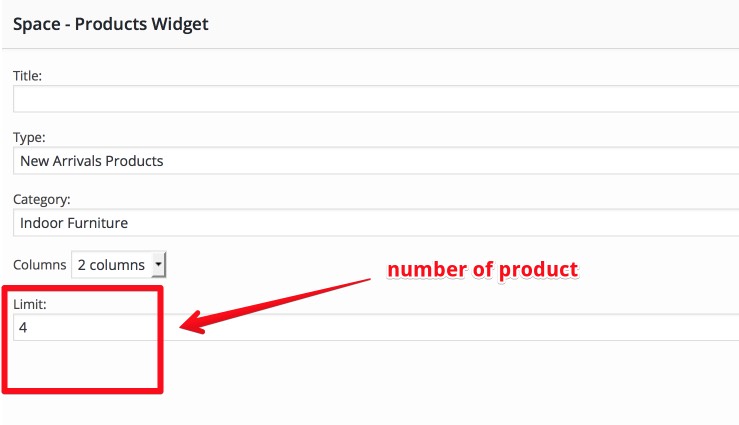

Space Product Tabs Widget
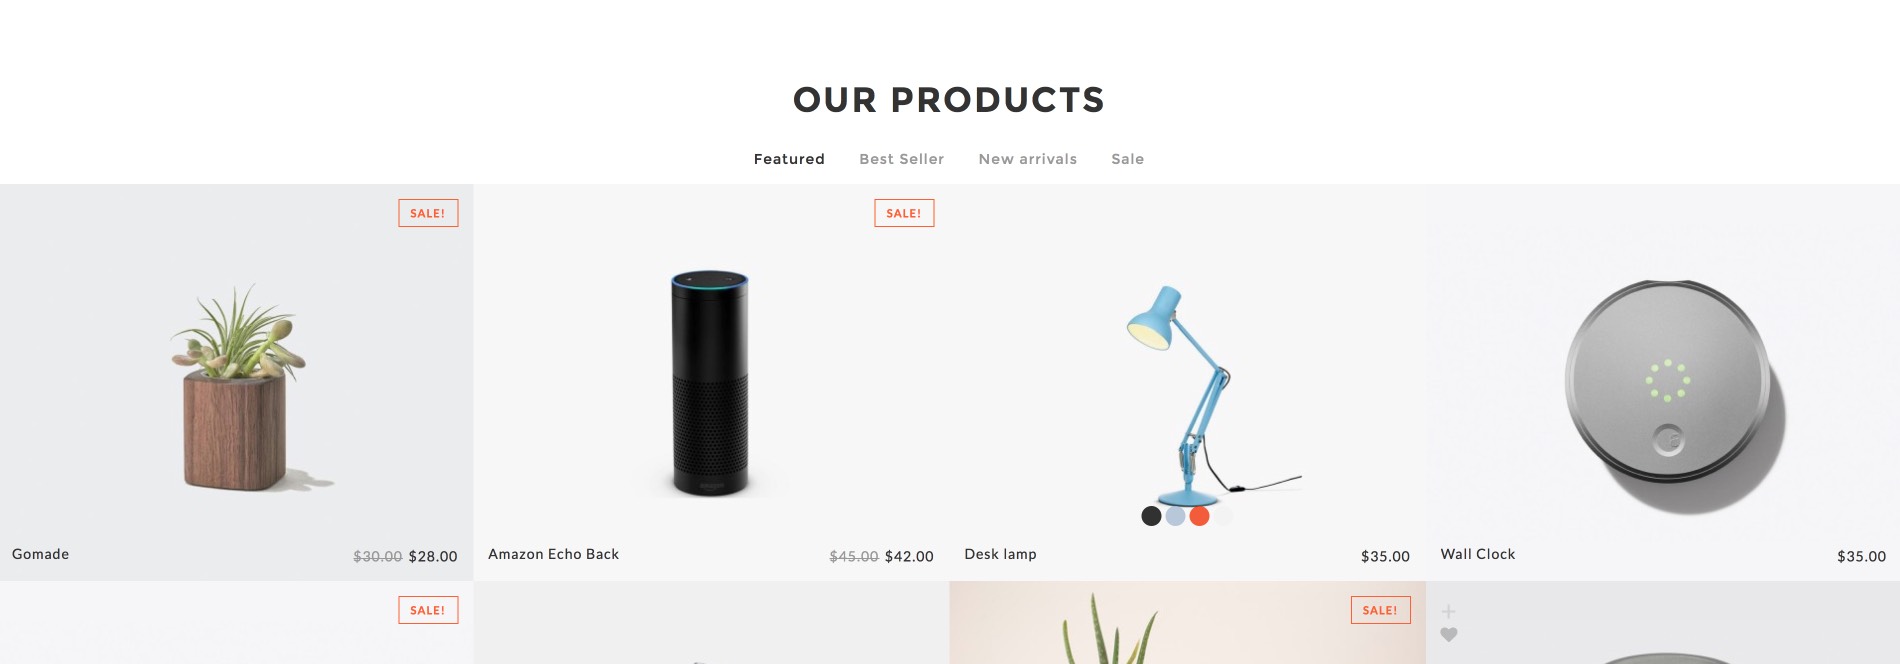
You can setup product tab for "Featured, Best Seller, Sale, New Arrivals" display as tab of product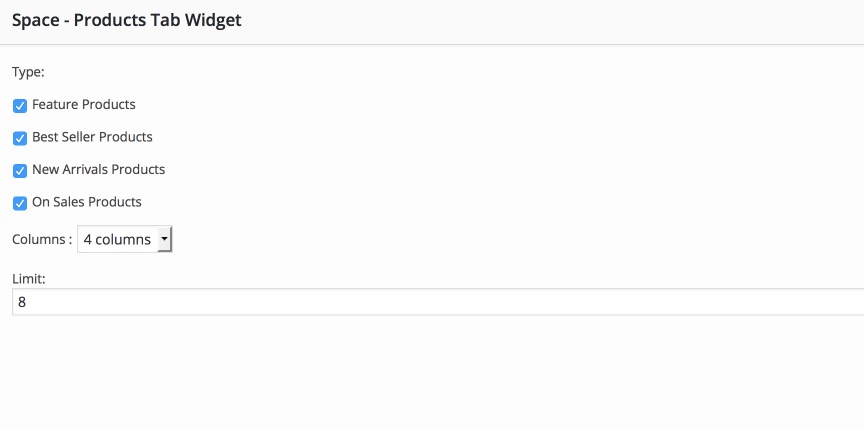
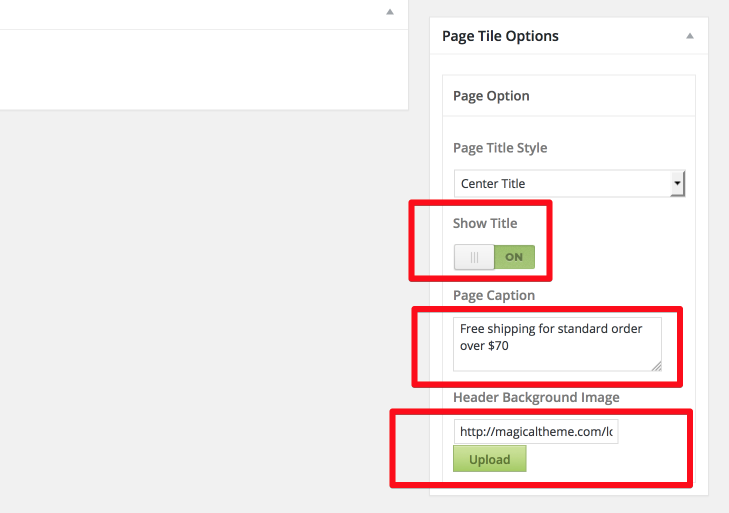
Page Title Options
1. Page Title Display
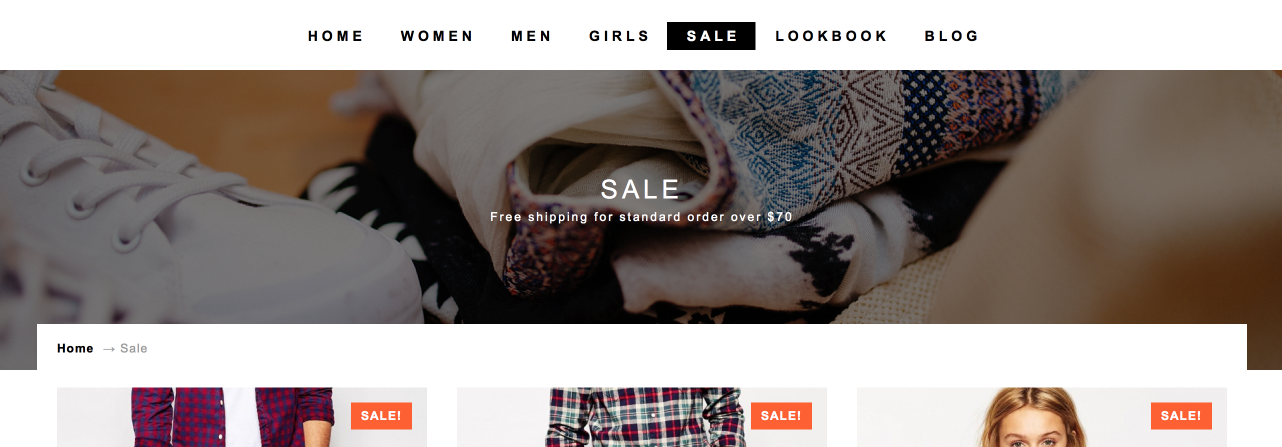
2. To display page title you have turn it on, add caption and upload background image
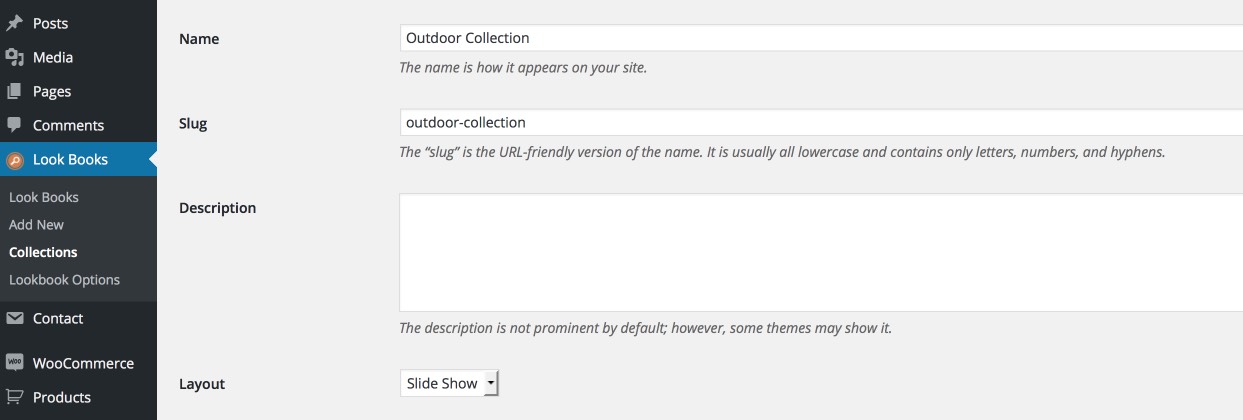
Create Lookbook Collection
Go to 'Look Books > Collections > Add New' to create new collection. There're 3 option to display your lookbook collections:- Slideshow
- Grid
- Flipbook
Create New Look
Go to 'Look Books > Add New' to create new look. You need upload featured image first and set image's size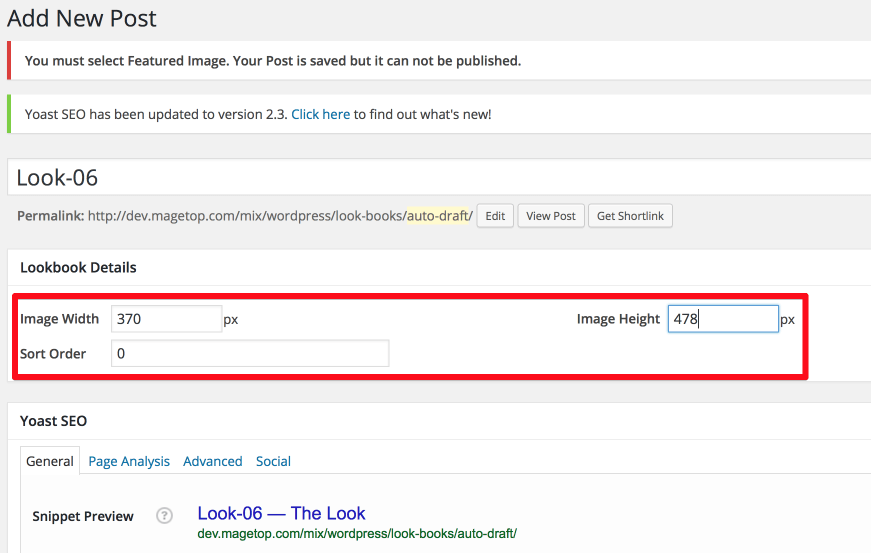
Add notes on look
After create the look you have to add note on image.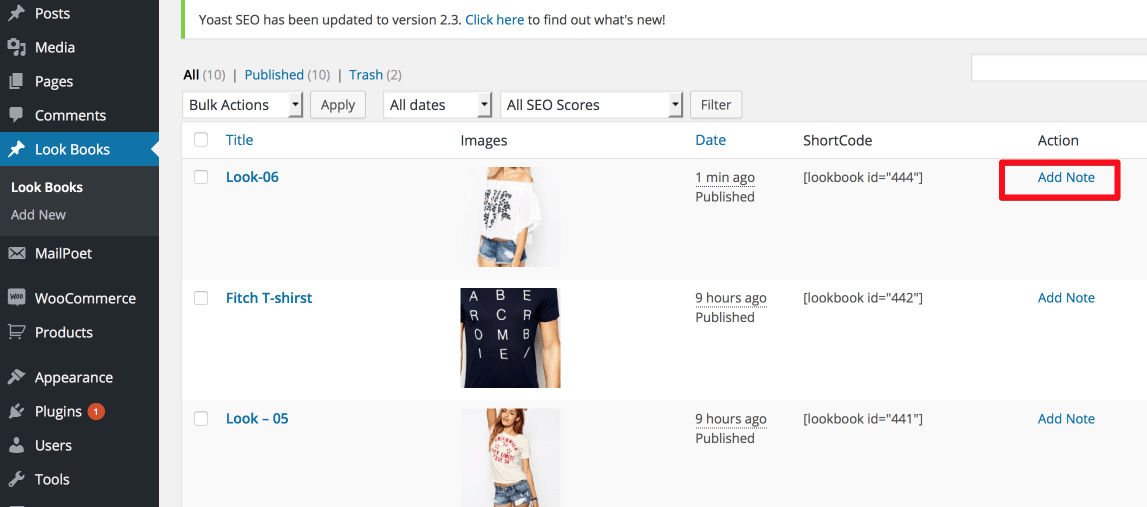
You can add one and more note on image and link your note to product
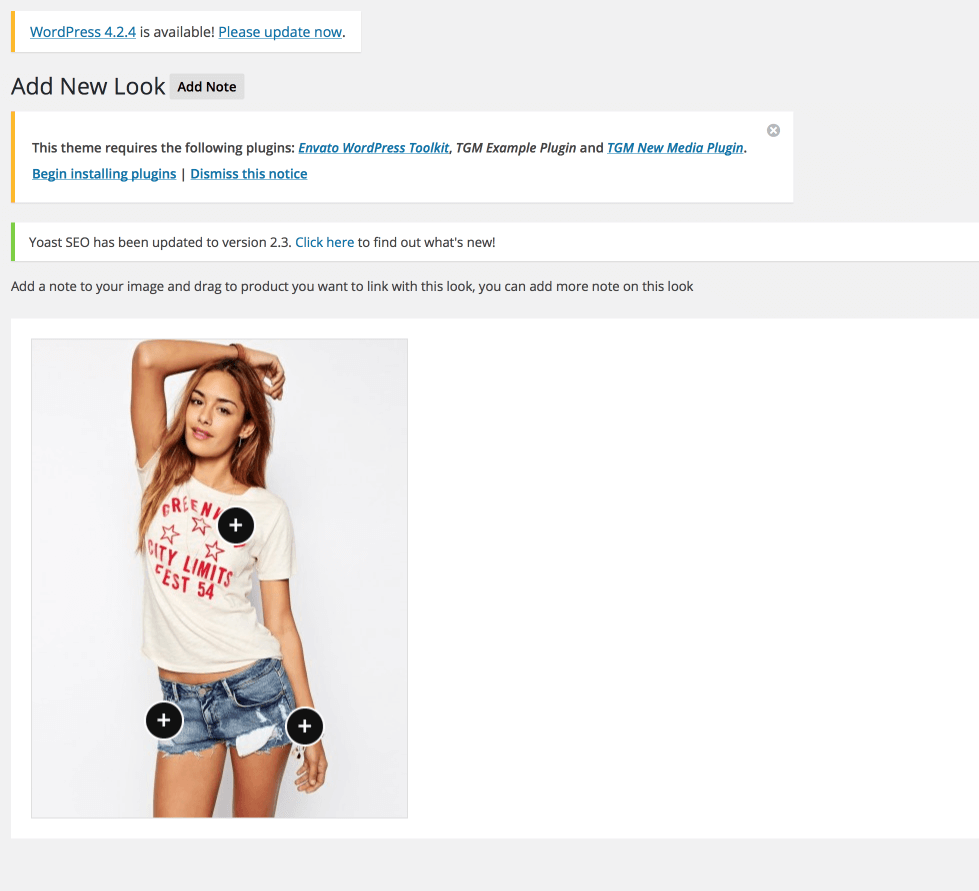
Lookbook Shortcode
You can add lookbook on you blog or any page using shortcode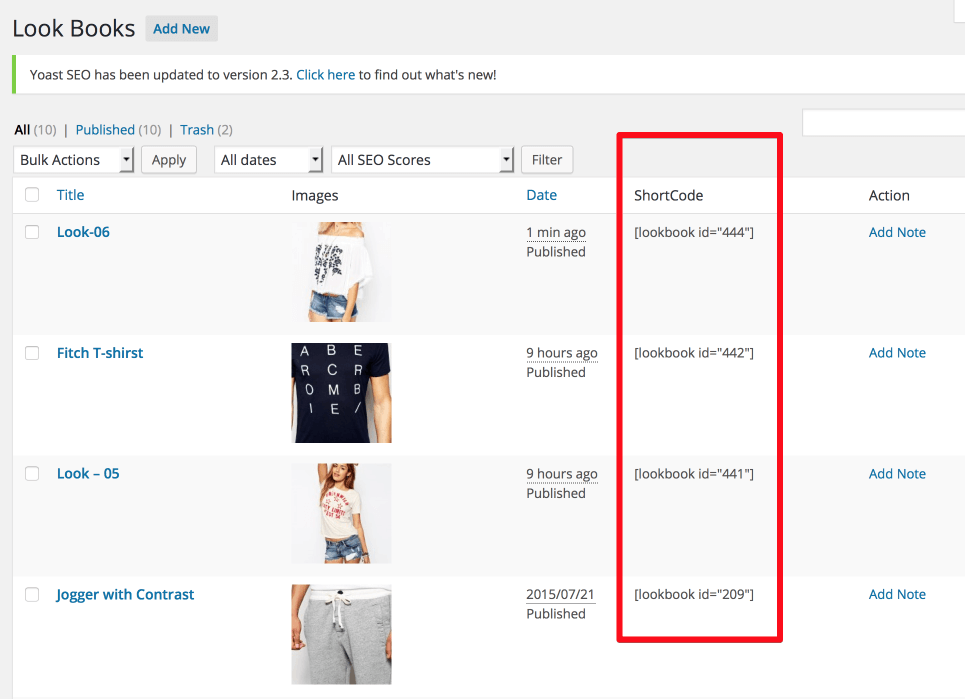
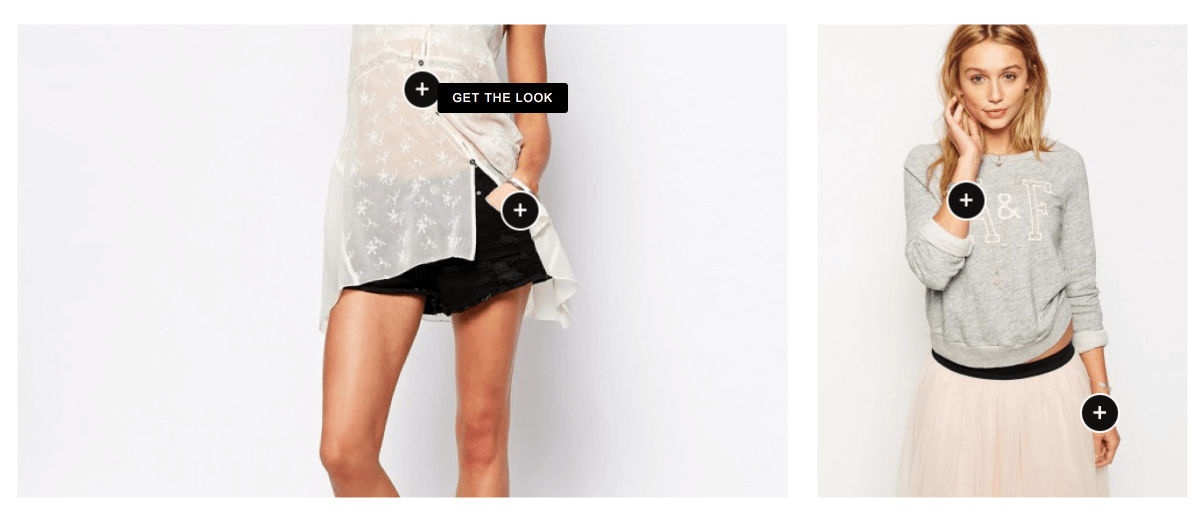
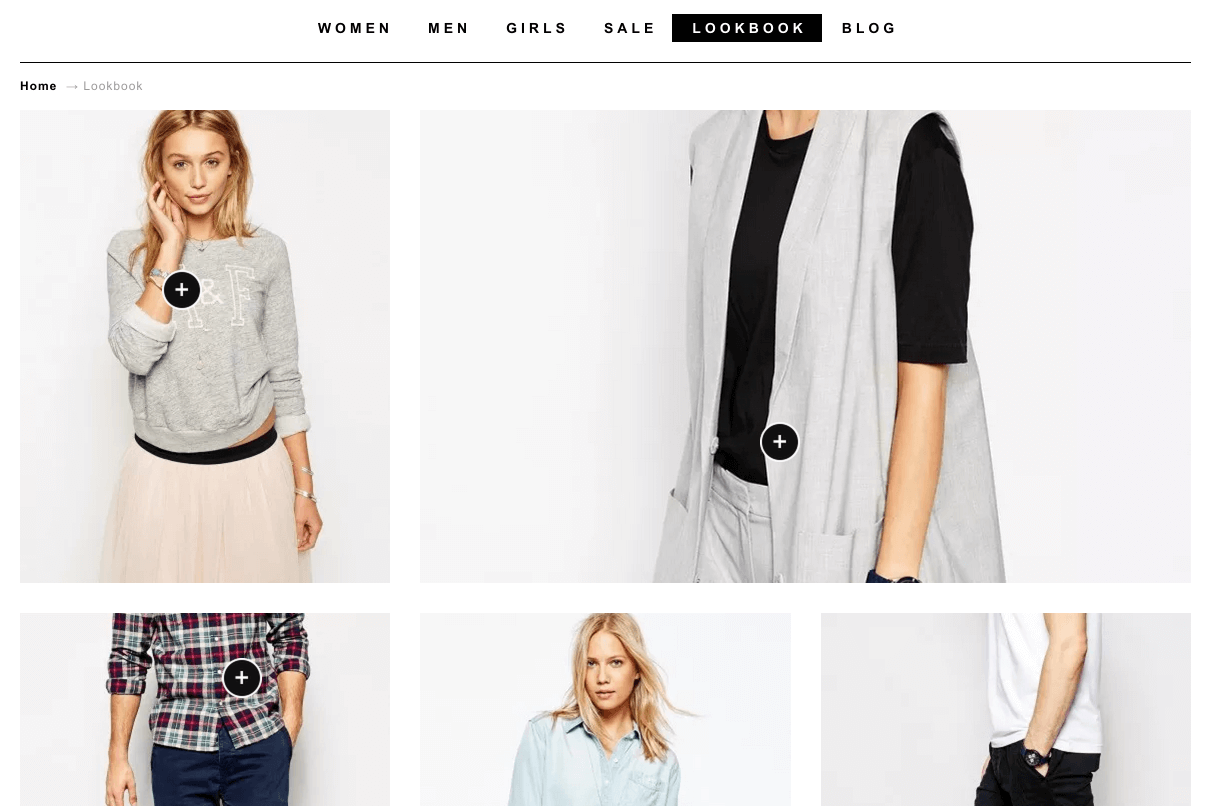
Lookbook Page
You can create one page to display all lookbook use code [lookbooks]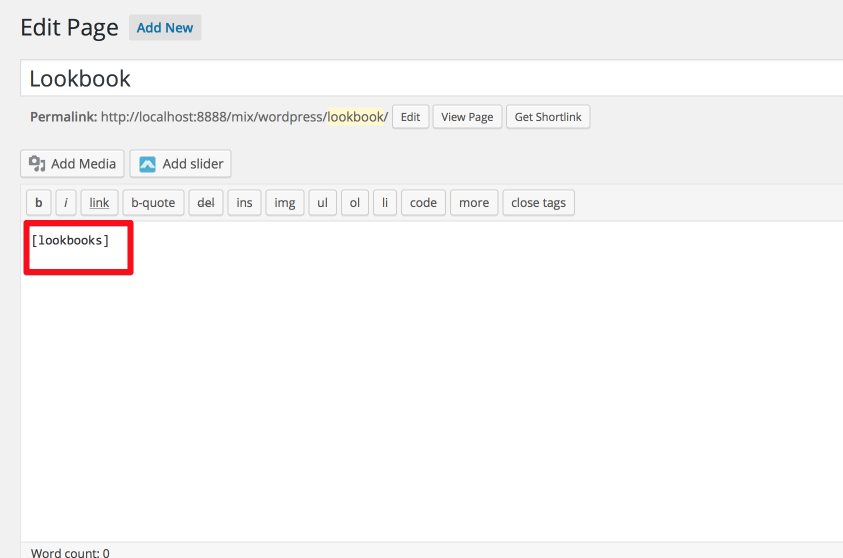
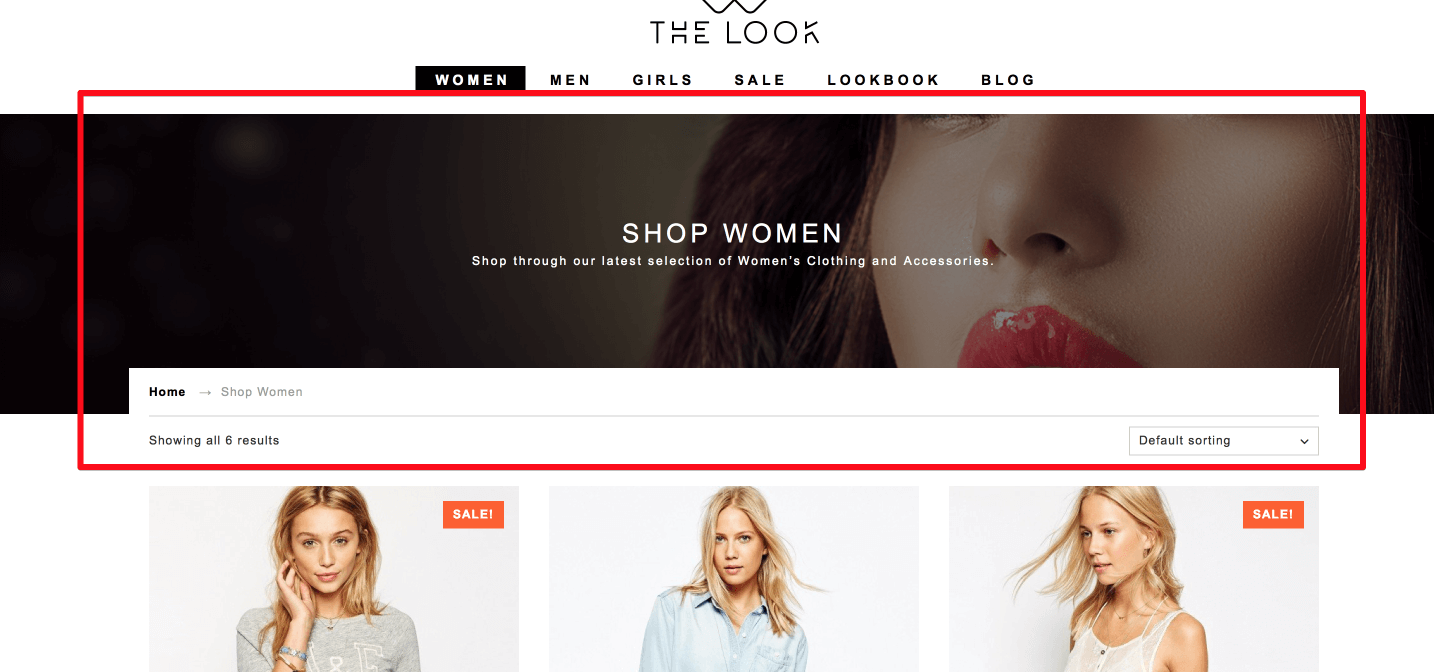
Category Header Background
To display link of category product like as demo and make your link friendly with SEO you have to go to 'Settings > Permanlinks' and set up follow screen-shot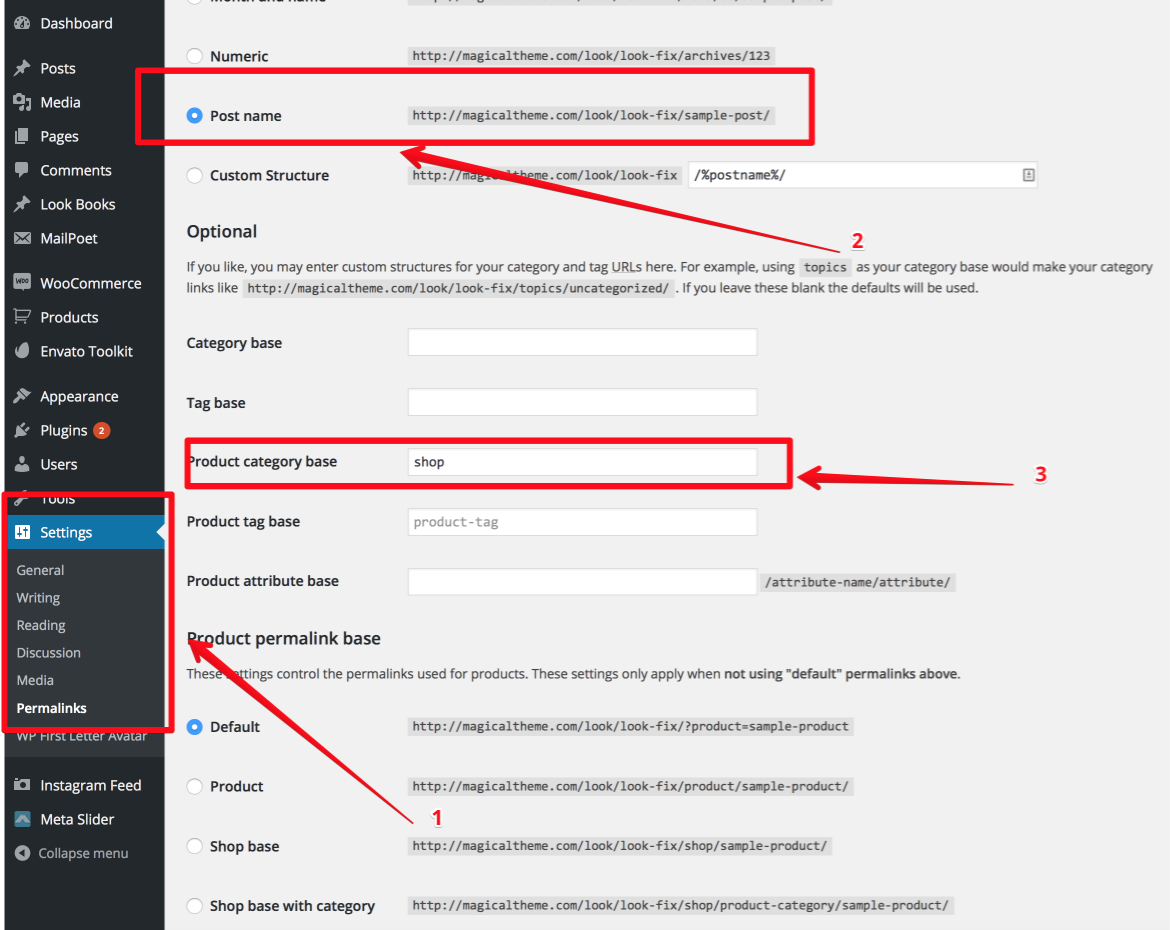
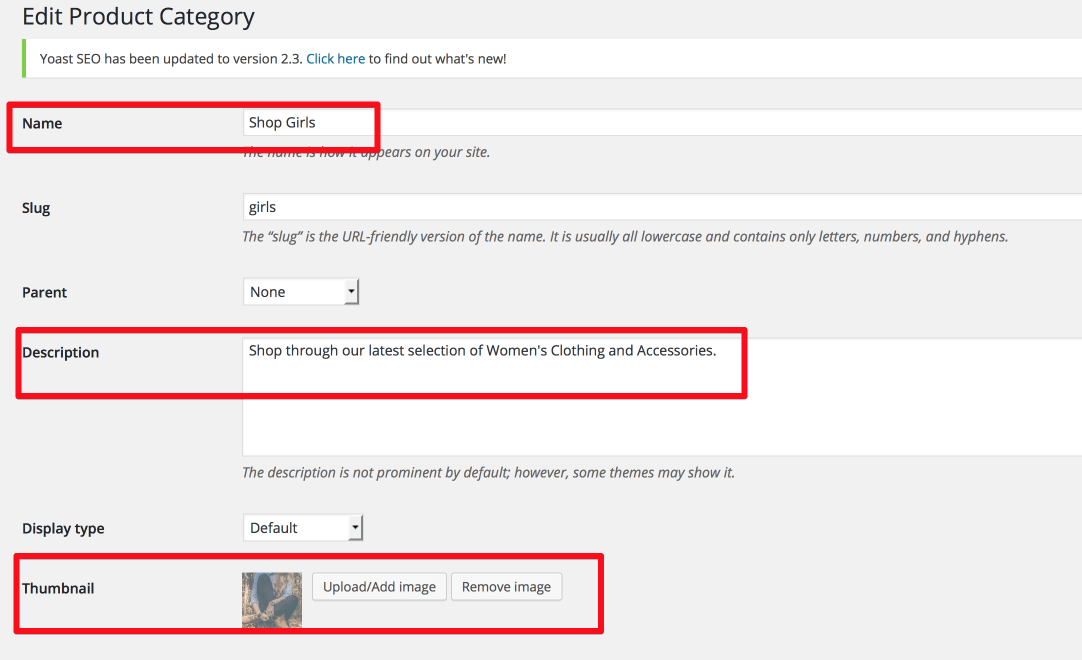
Go to "Products > Categories to create new Product Category and upload image as background
Category Layout Option
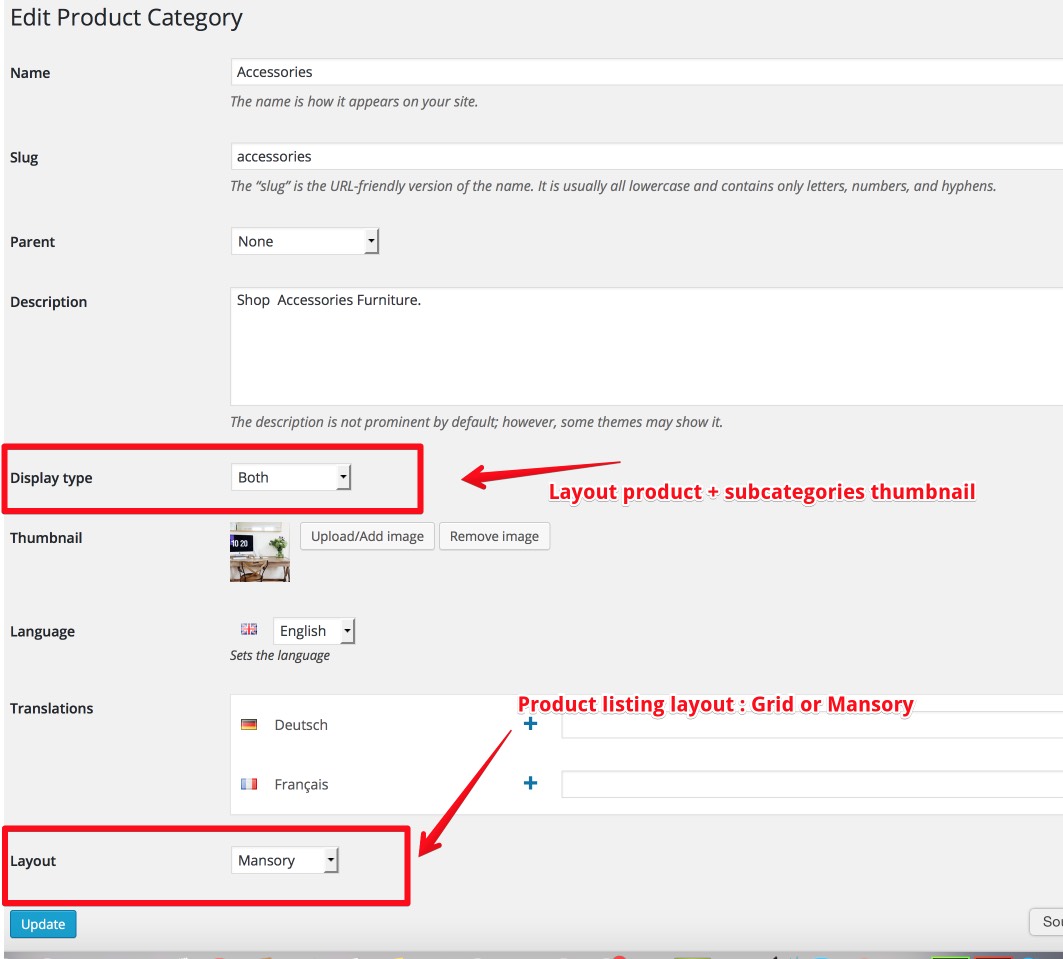
- You can setup category layout contain only products, only subcategories or both subcategories + products- We add new option for you can set product category page add Grid layout default or Mansory with lazyload category layout
Product Attributes
To display product attributes (colours, size) you have to create product attributes first.1. Go "Products > Attributes" to create attribute
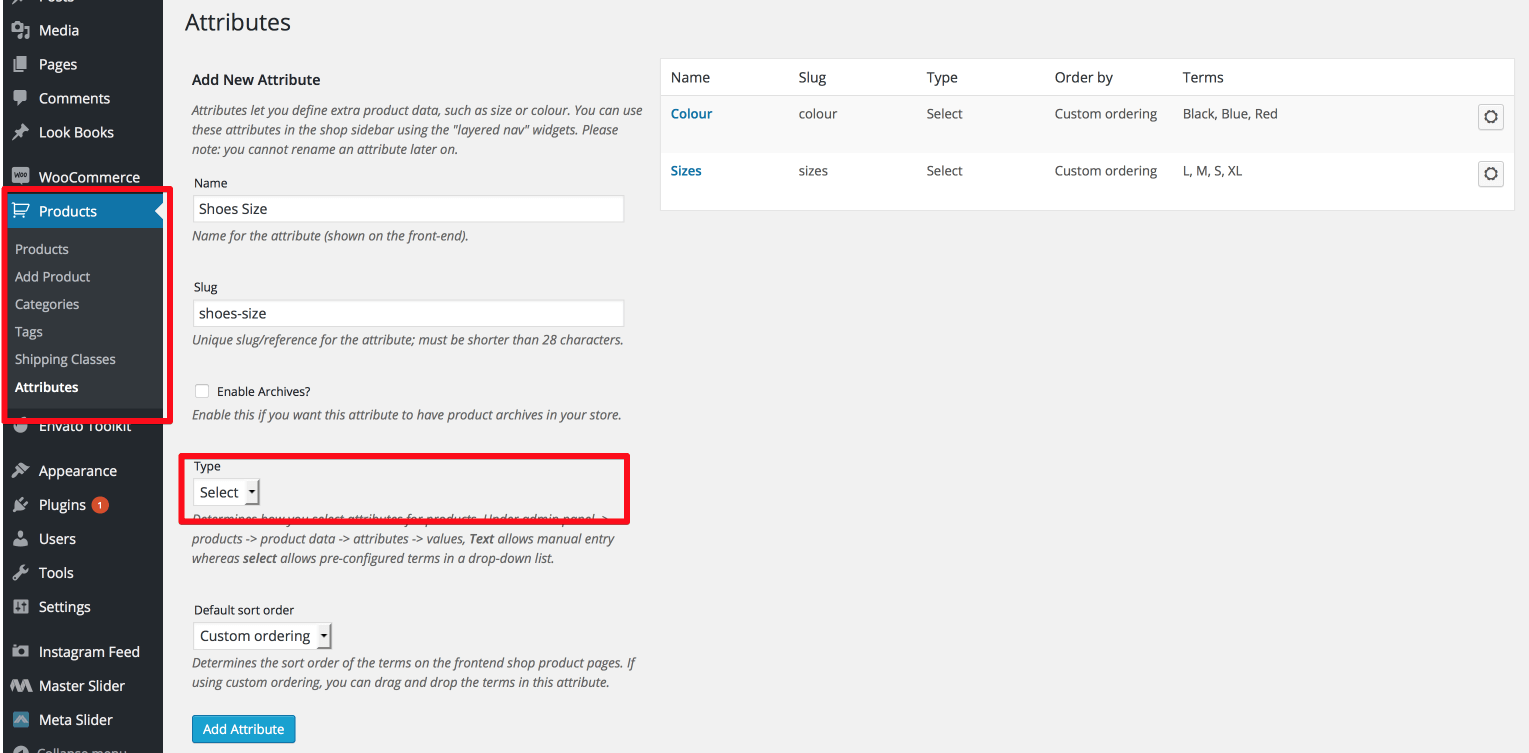
2. After create attribute you have to click on icon to add attribute (example 'Size: XS | S | M | L | XL')

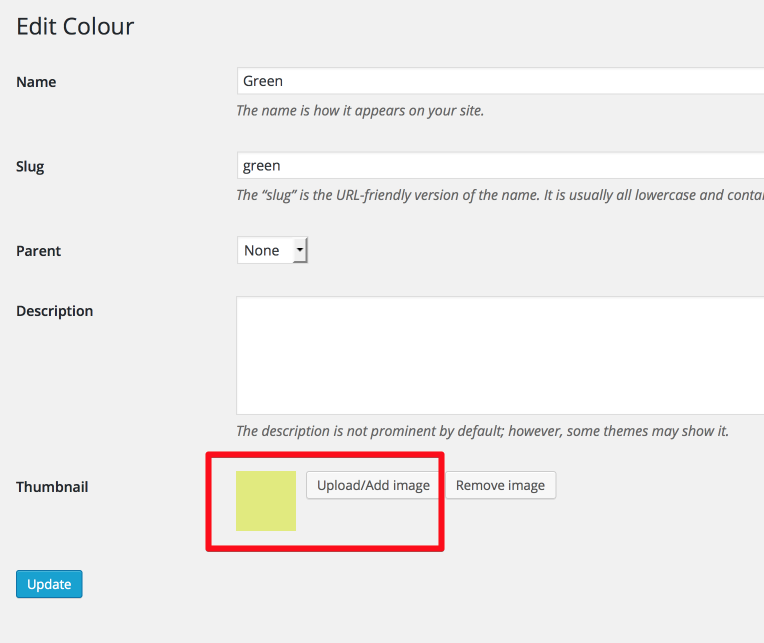
3. Upload thumbnail images for colours
Open Swatch Plugin
After create product attributes you can enable open swatch to use for product by go Dashboard > WooCommerce > MG Open Swatch.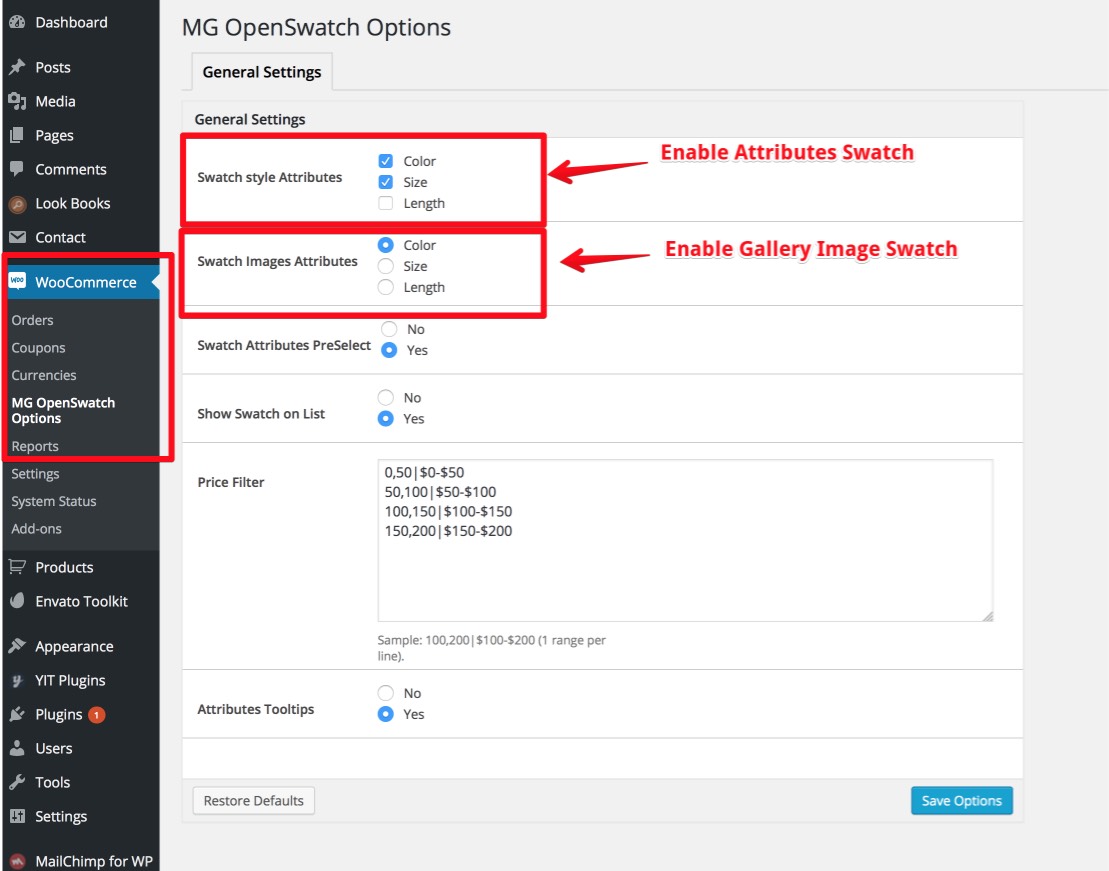
1. Setup attibutes for individual product

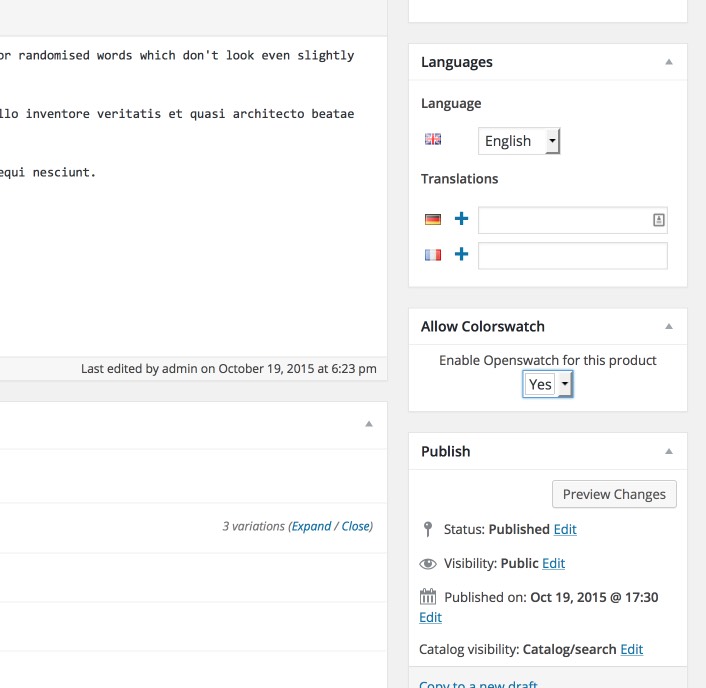
2. Allow Color Swatch
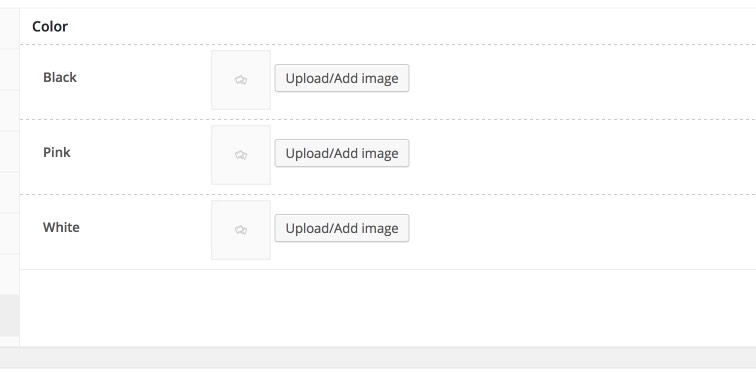
3. Setup Image Swatch
Product colour and size
After create attributes you can display atrribute on product "Quick View" and Product detail page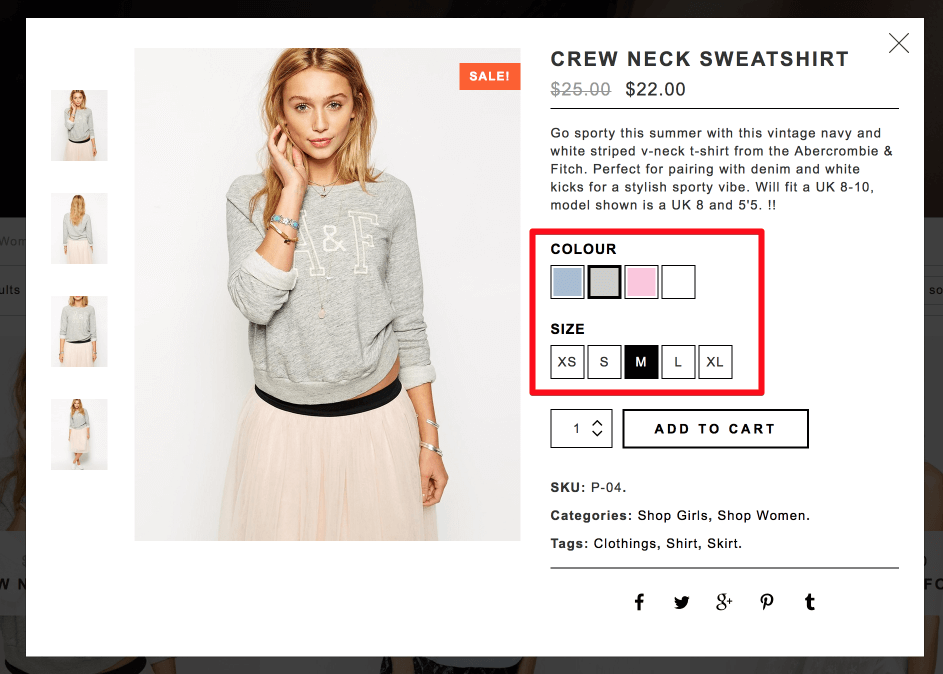
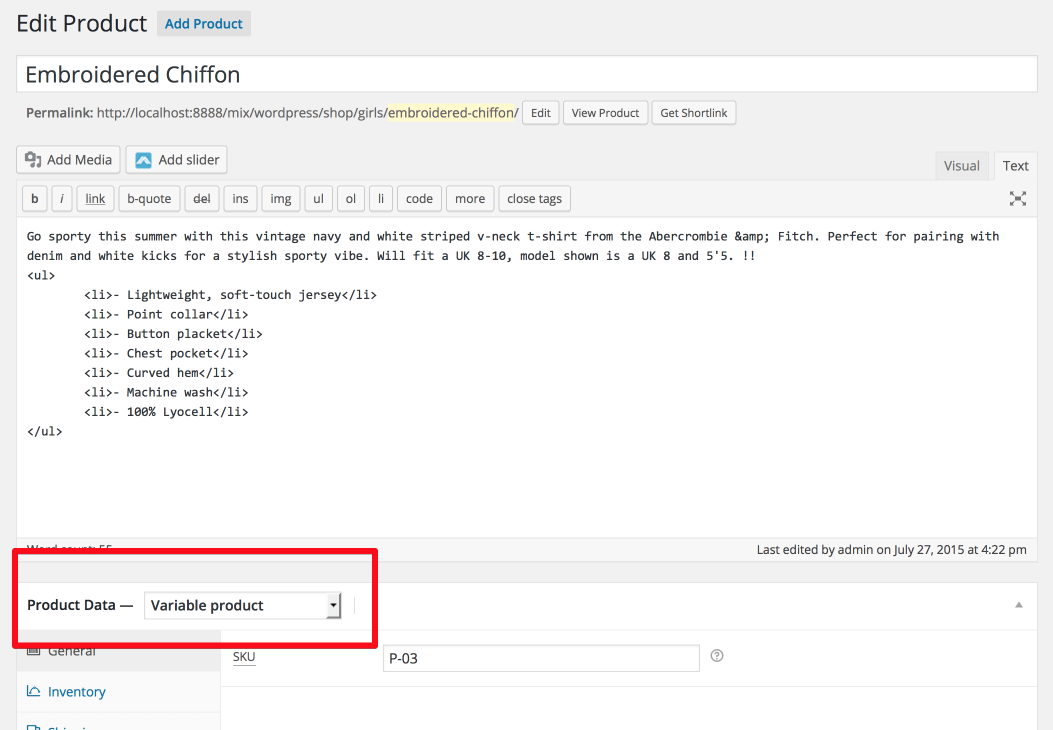
1. Create new product and set Product Data "Variable Product".
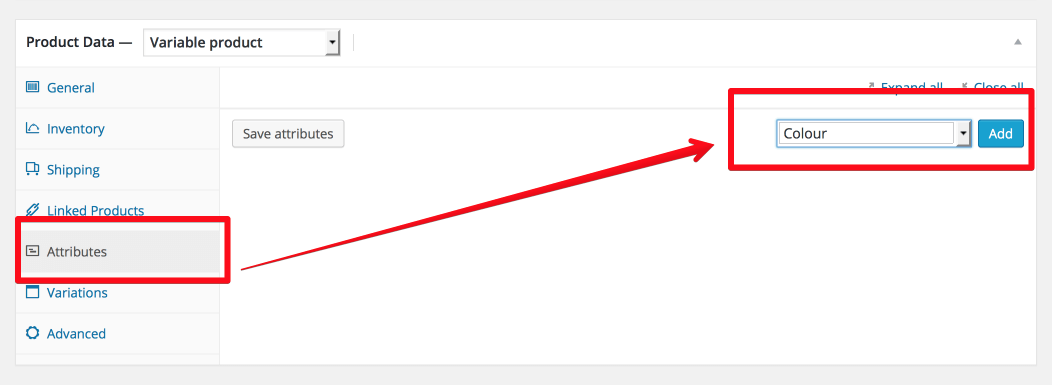
2. Add attribute for this product.
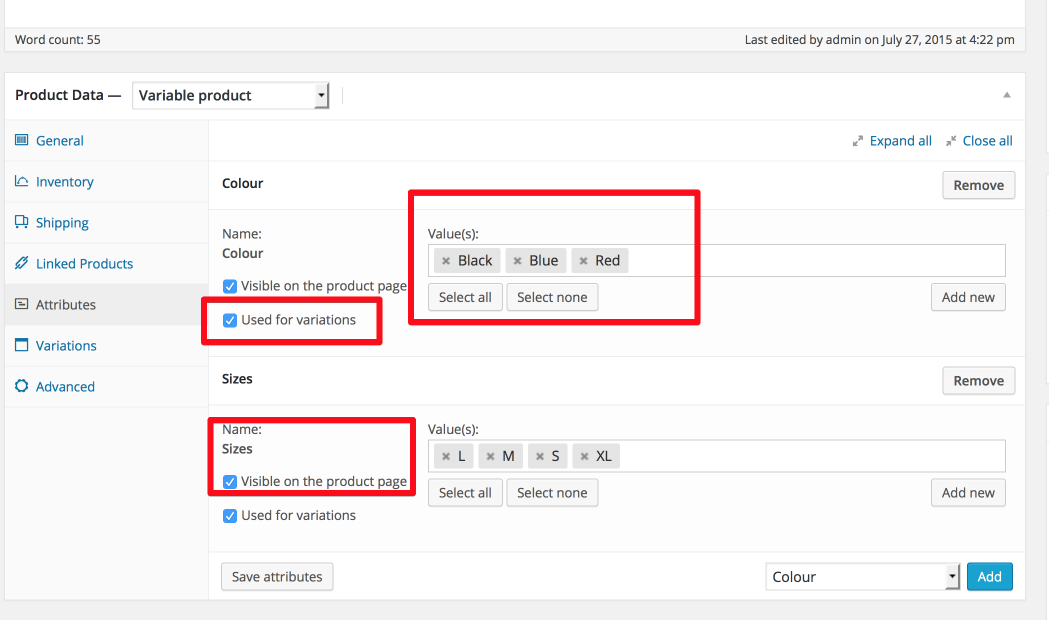
Remember tick on all checkbox
- Visible on the product page
- Used for variations
3. Set image and assign with atttribute color.
Choose color and any size and upload thumb as color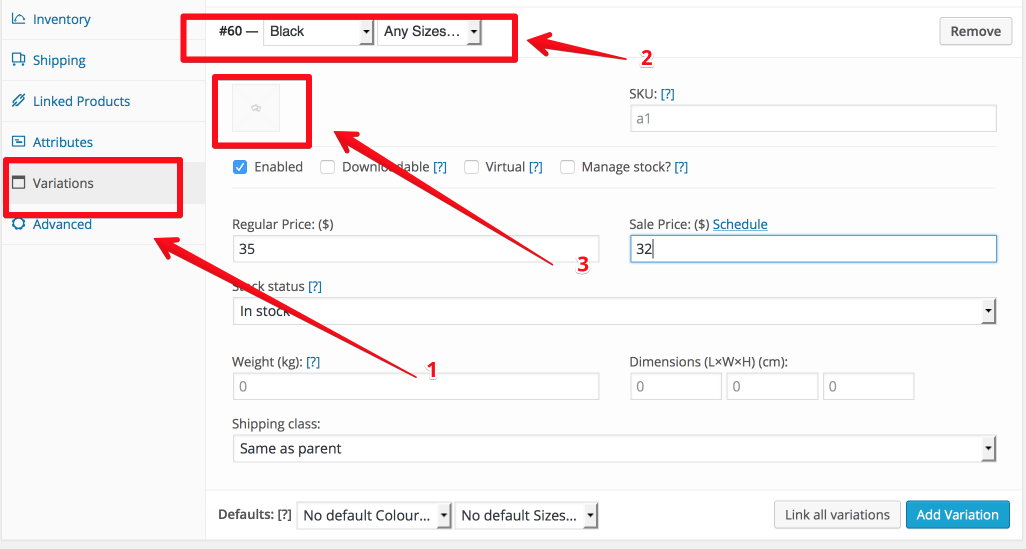
3. Set default colour and size for product.
After set image thumbnail as color and size for product you should set default colour and size to display for product.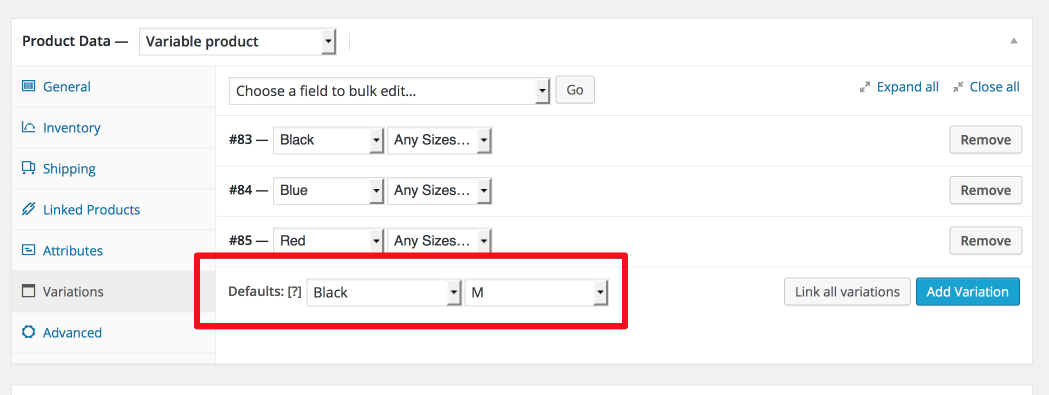
4. Display colors swatch gallery for images
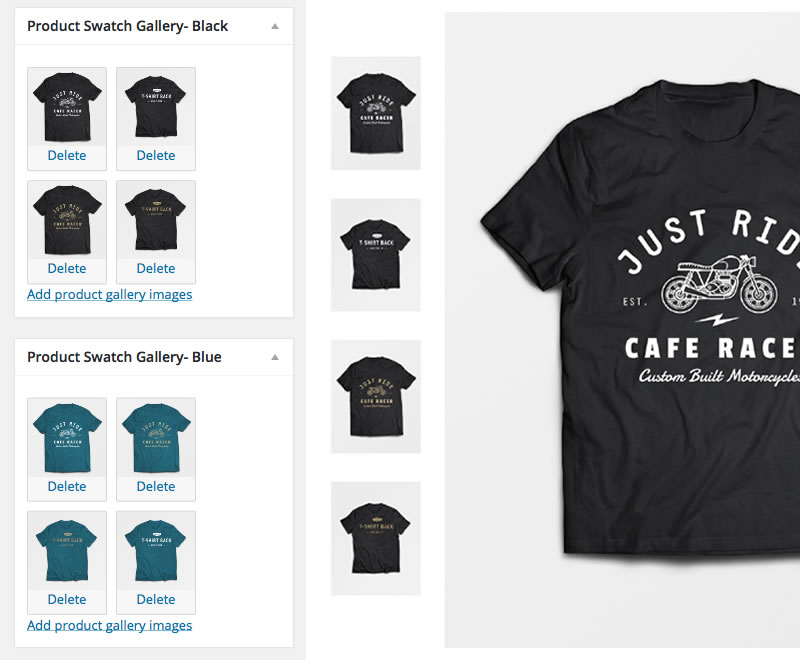
Demo link: http://magicaltheme.com/look/look-fix/product/sporty-t-shirt/
MG Currency
Your site using multi currency go Dashboard > WooCommerce > Currencies.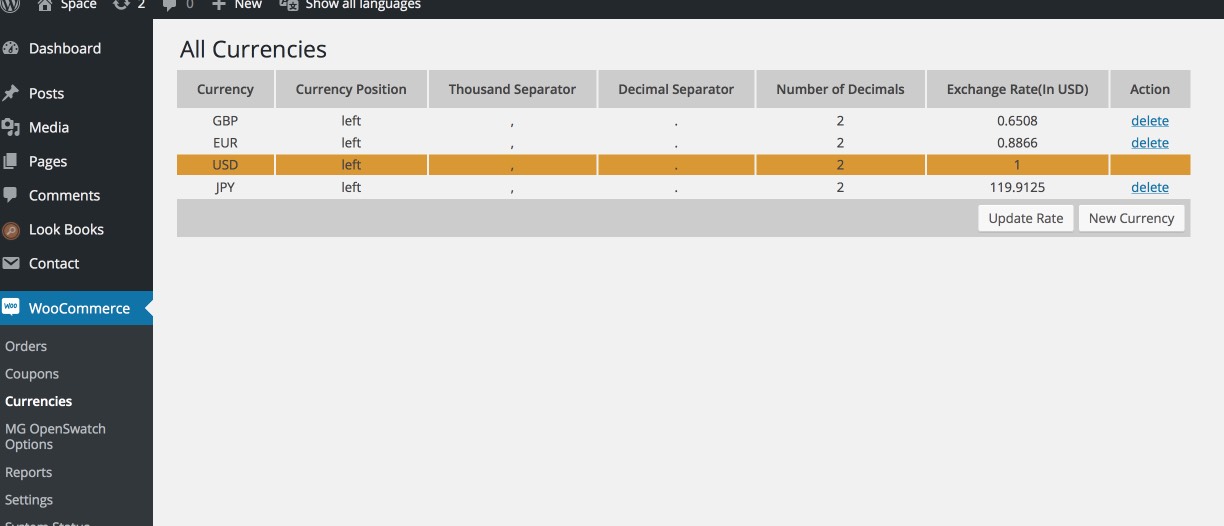
MG Brands
You can setup your product Brand by go Dashboard > Products > MG Brand and create Brand for productProduct Detail Layout Option
Our theme have 3 option to display product detail page layout.1. Config product detail layout for all product
Go to Dashboard > Space Theme Options > WooCommerce Settings > Product Detail Layout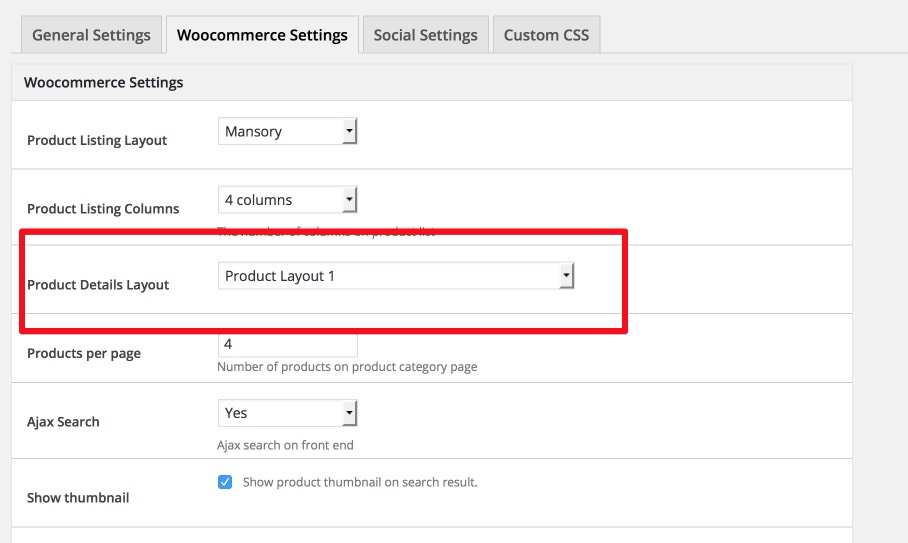
2. Config product detail layout for individual product
We also have option for you can easy setup layout for individual product when you create/edit product you can choose layout for this product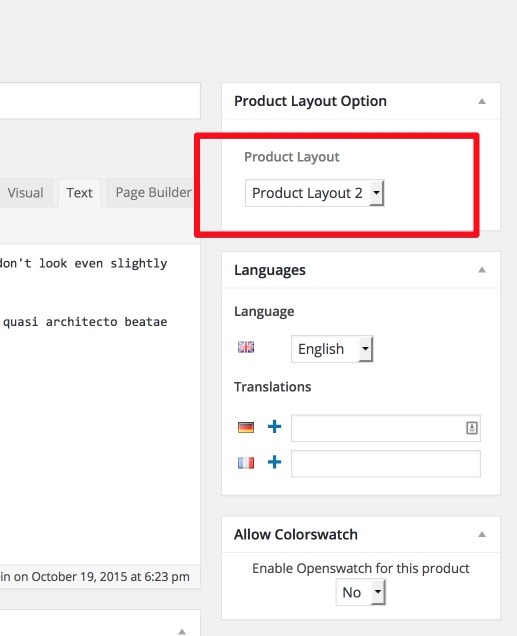
New Arrival Product
Our theme have option to display new arrival product. You can easy to config time display for product as new arrival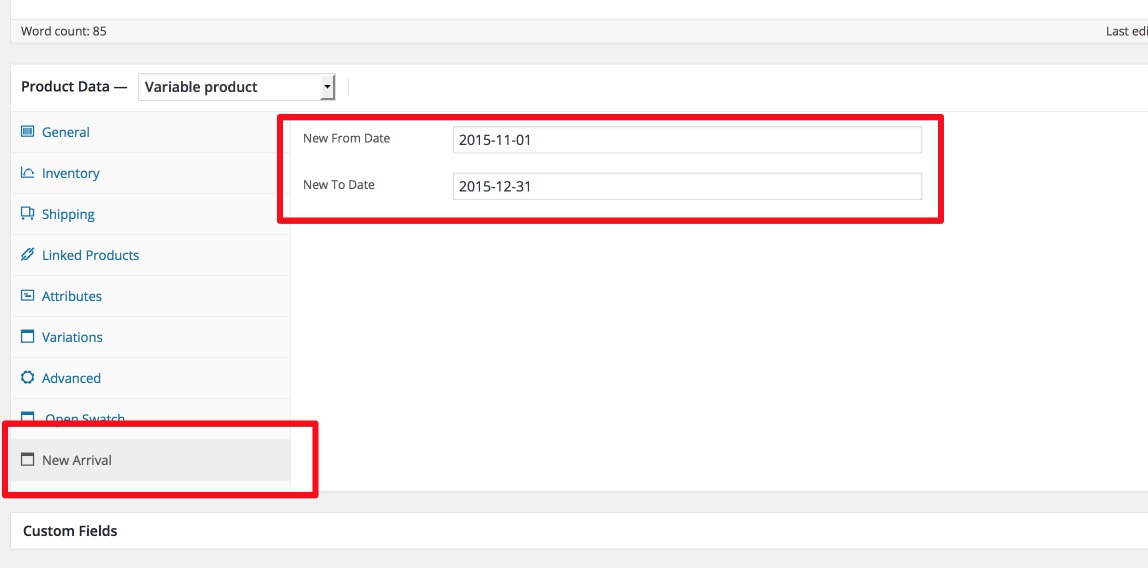
Product's images size
There're several predefined thumbnail product's images size, catalogue product's images size and single product's image size. Which you have to set in "Woocommerce > Settings > Product tab > Display "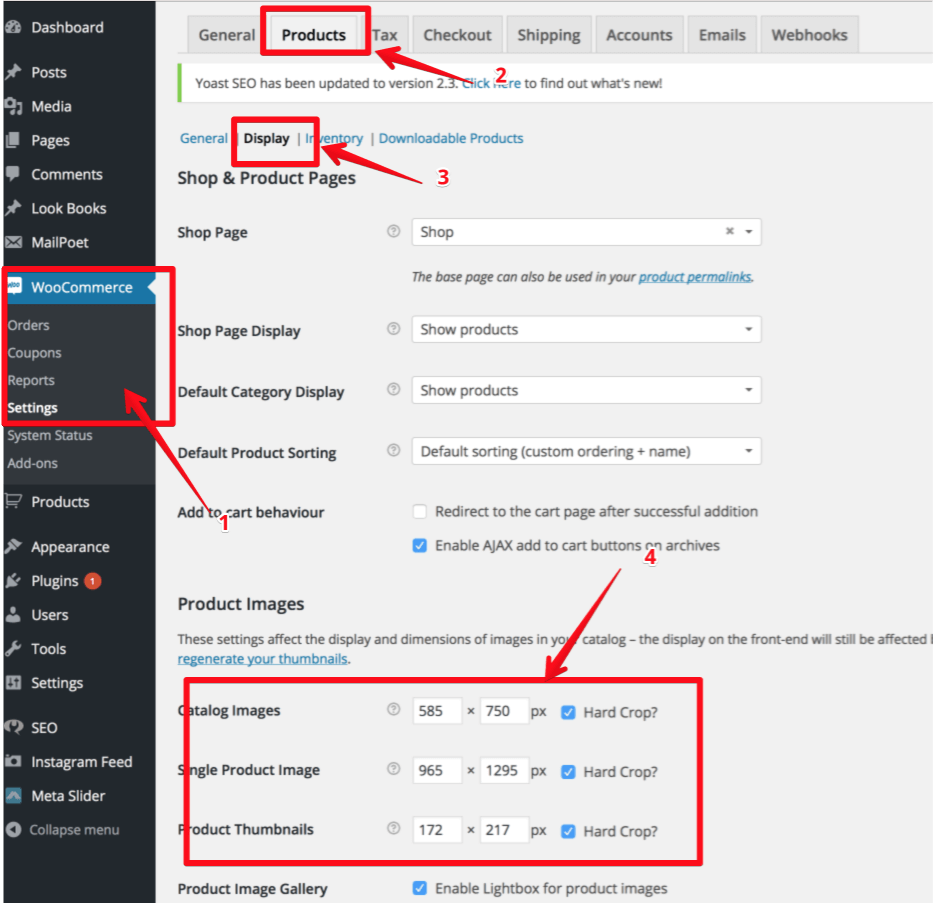
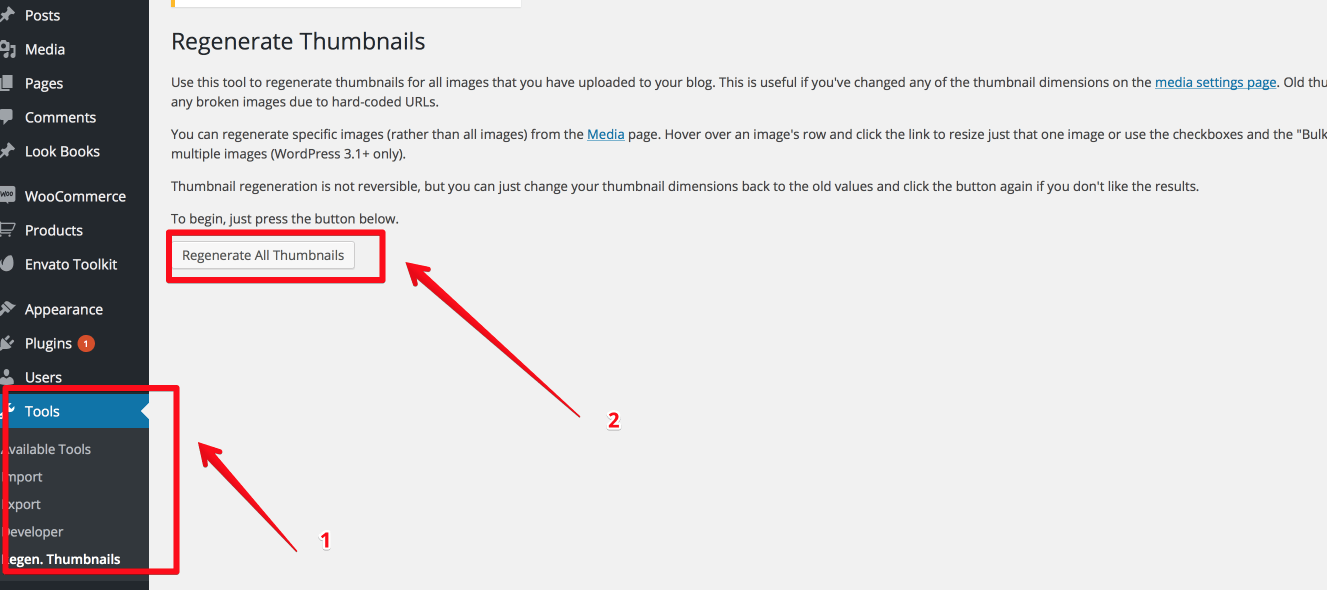
- If you upload images before and want to regenerate thumbnail you can use Regenerate thumbnail plugin to apply your settings with thumbnail.
- After install plugin you go to "Tools > Regenerate Thumbnails"
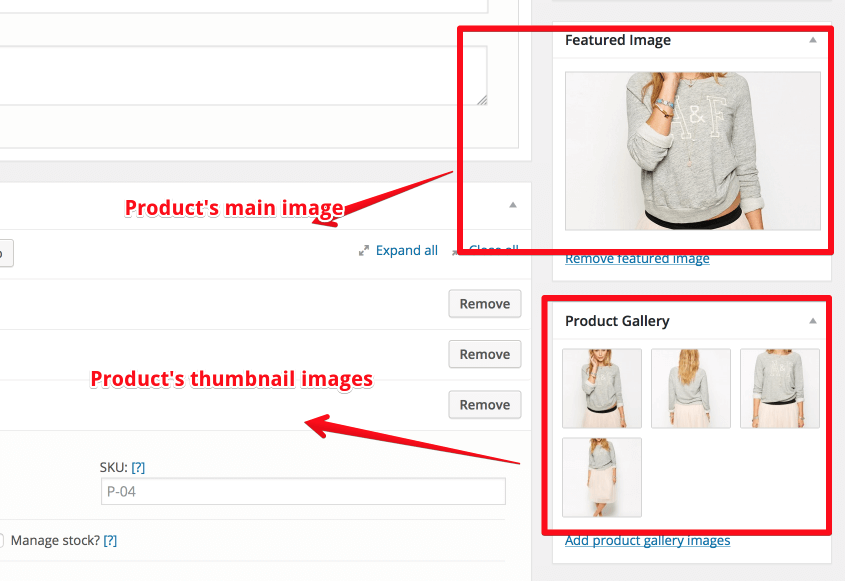
Product Images
Upload images to display on product detail. Upload featured image as main image and gallery as thumbnail images
Email transaction customize
To customize you transaction email of Woocommerce go to 'Woocommerce > Settings > Email'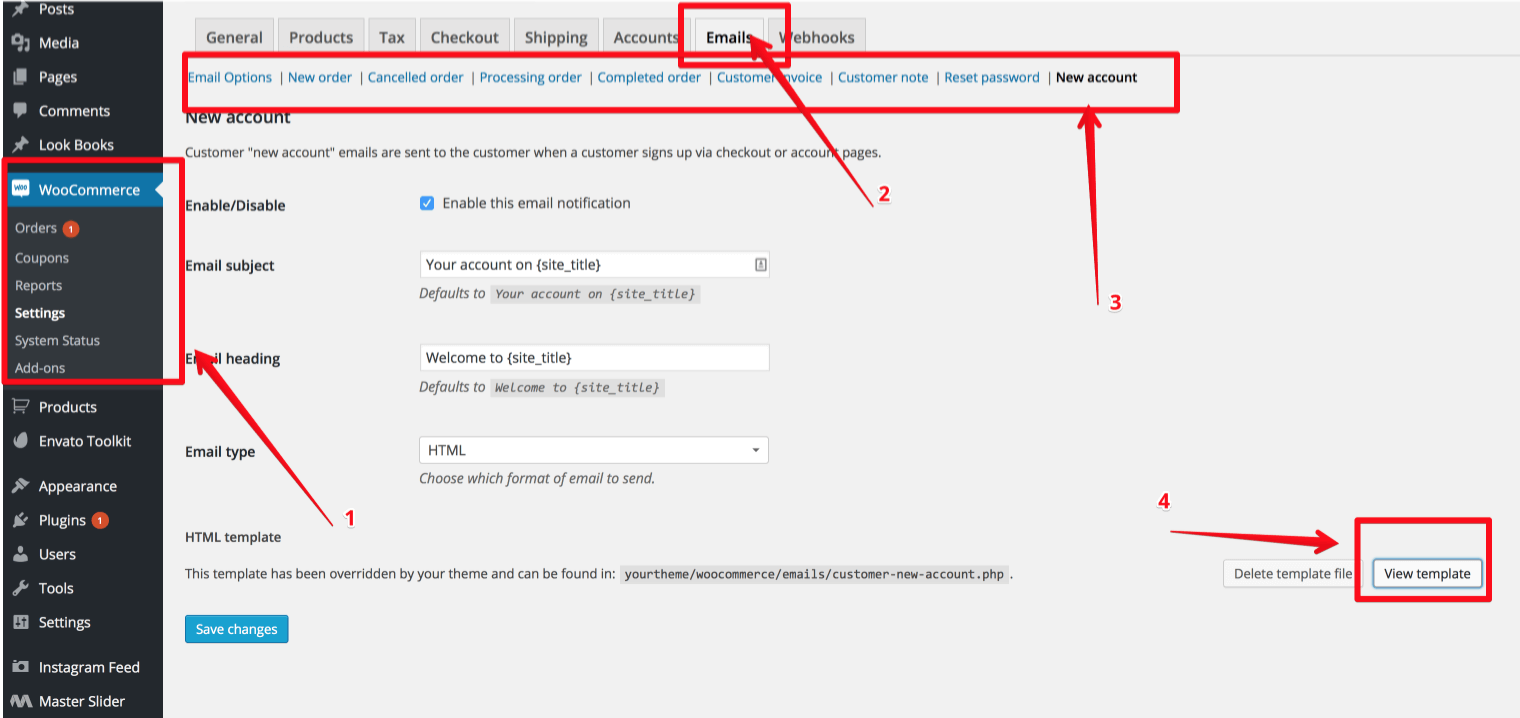
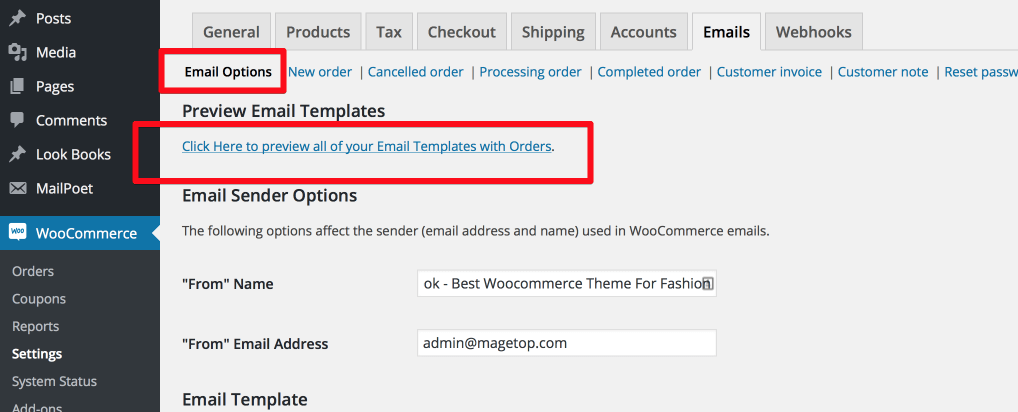
You can "Preview Email Templates" in menu 'Woocommerce > Settings > Email > Email Options'
MailChimp Newsletter
1. You need to download install MailChimp Newsletter plugin
2. Get MailChimp API key

3. Edit form
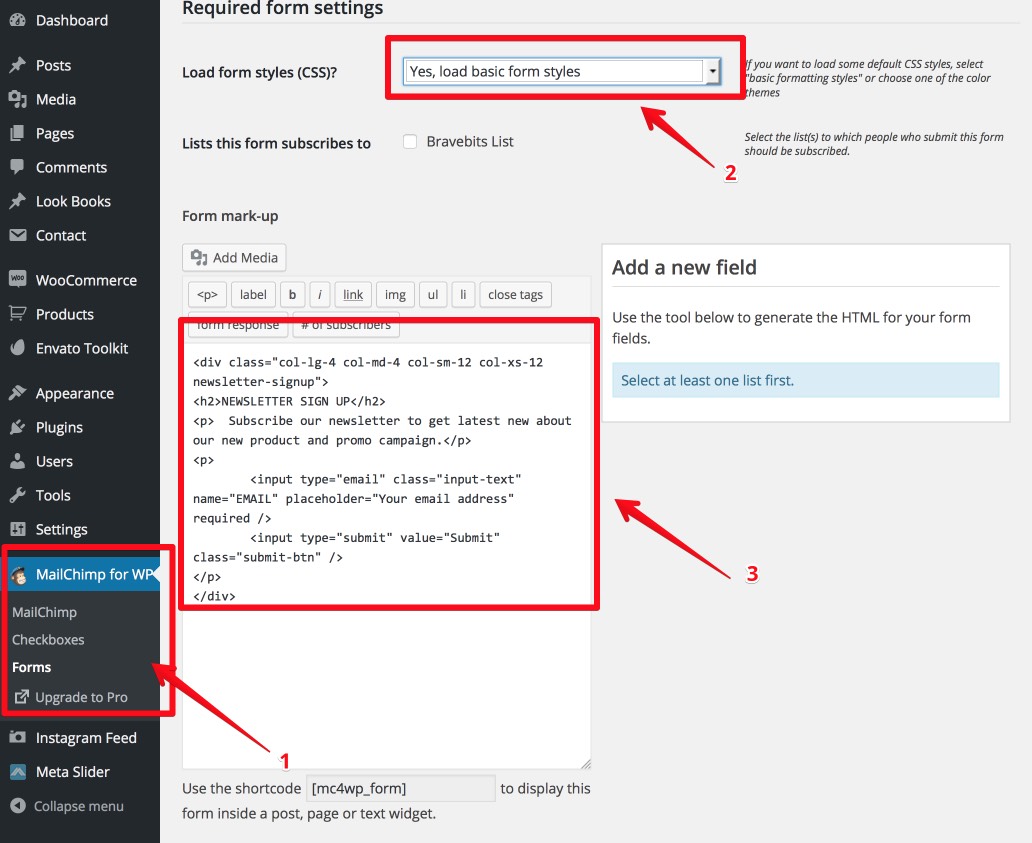
4. Display Subscribes Form
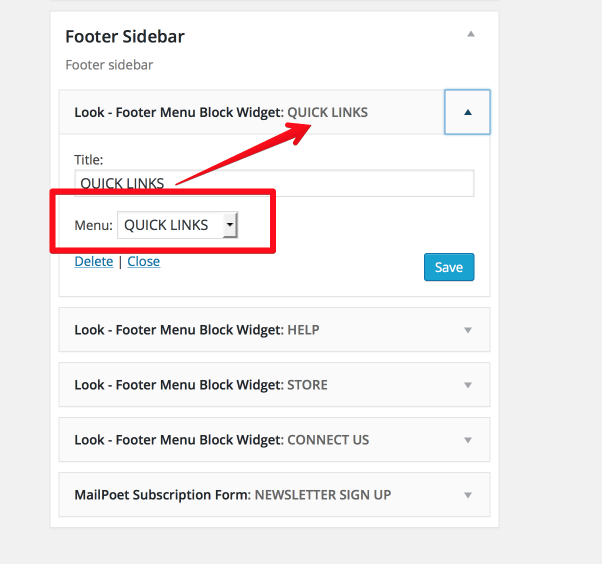
- Create a widget and display this widget at Footer Sidebar: Go 'Appearance > Widgets > Text Widget' and add to 'Footer Sidebar'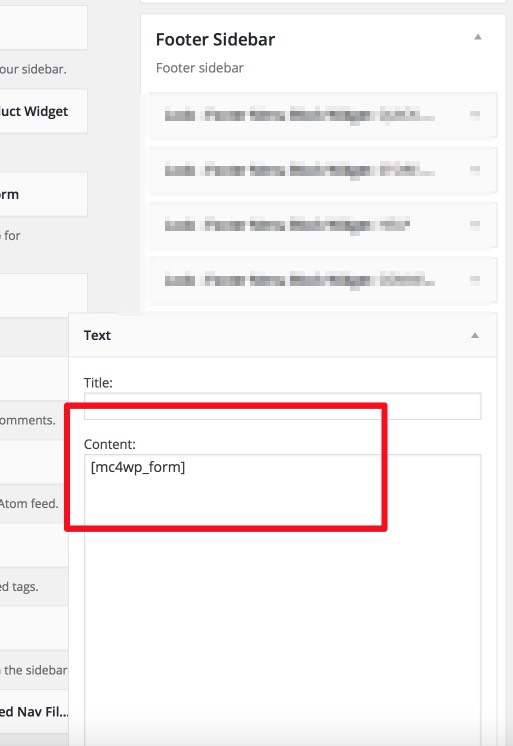
5. Result

Instagram Feed
1. You need to download install Instagram Feed plugin
To setting your instagram feed go menu 'Instagram Feed > Config'2. Get your Instagram Access Token and User ID at here
You can add more user ID to display feed from more Instagram's account. To check Instagram user's ID you can use this tool.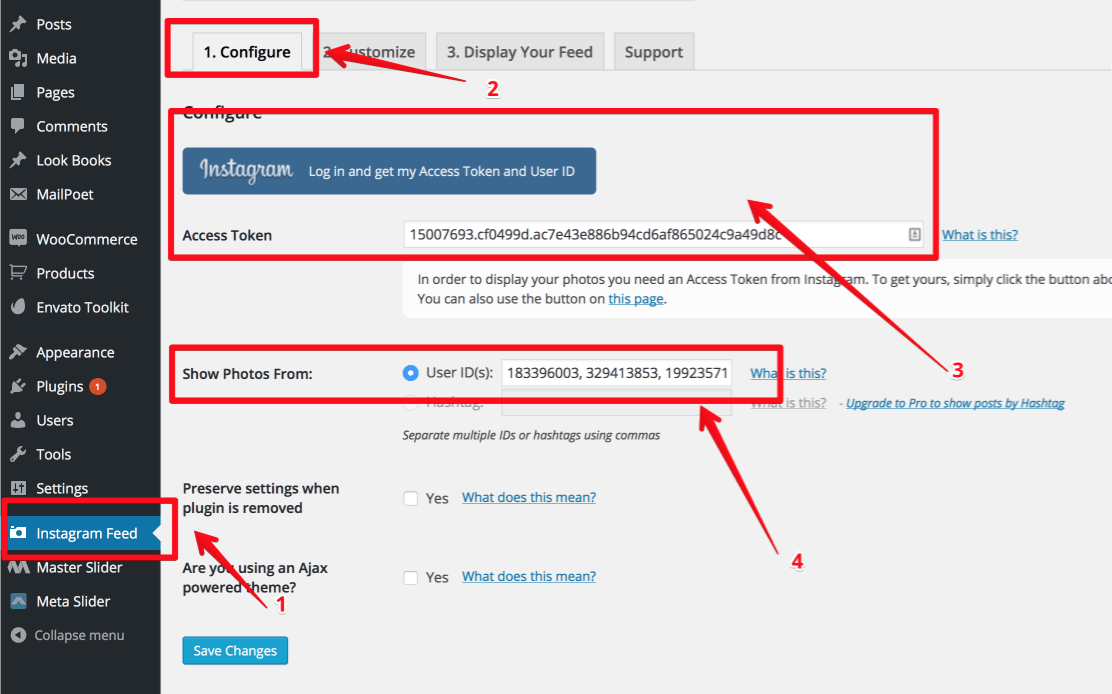
3. Instagram Customize (Customize size of instagram feed to fit with your content)
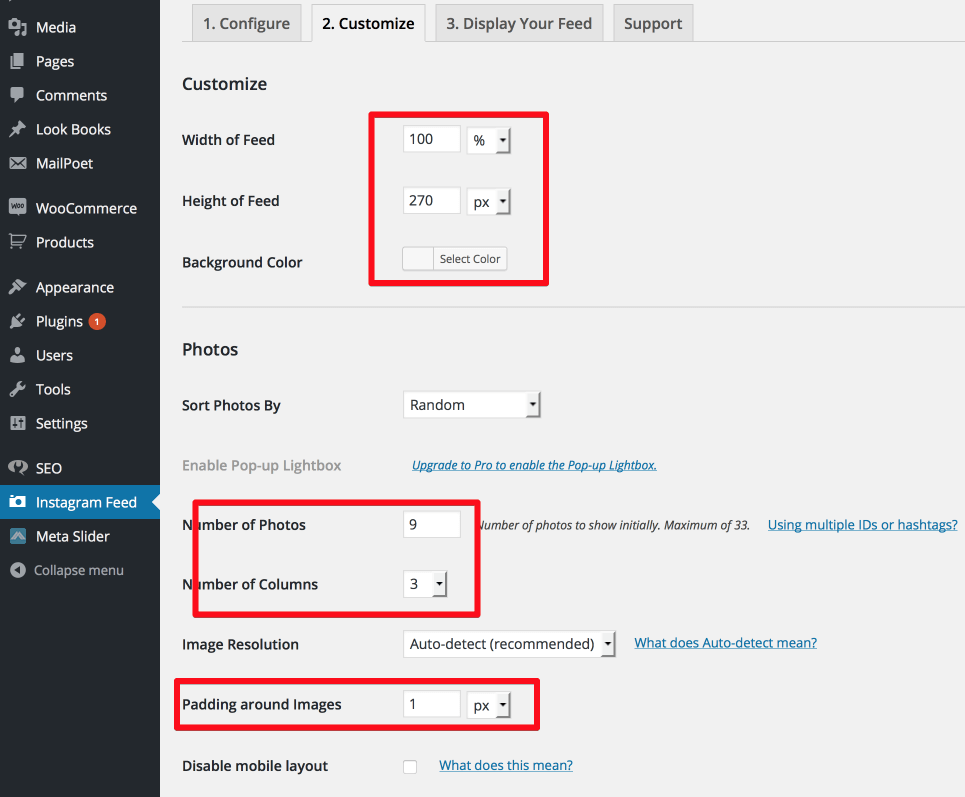
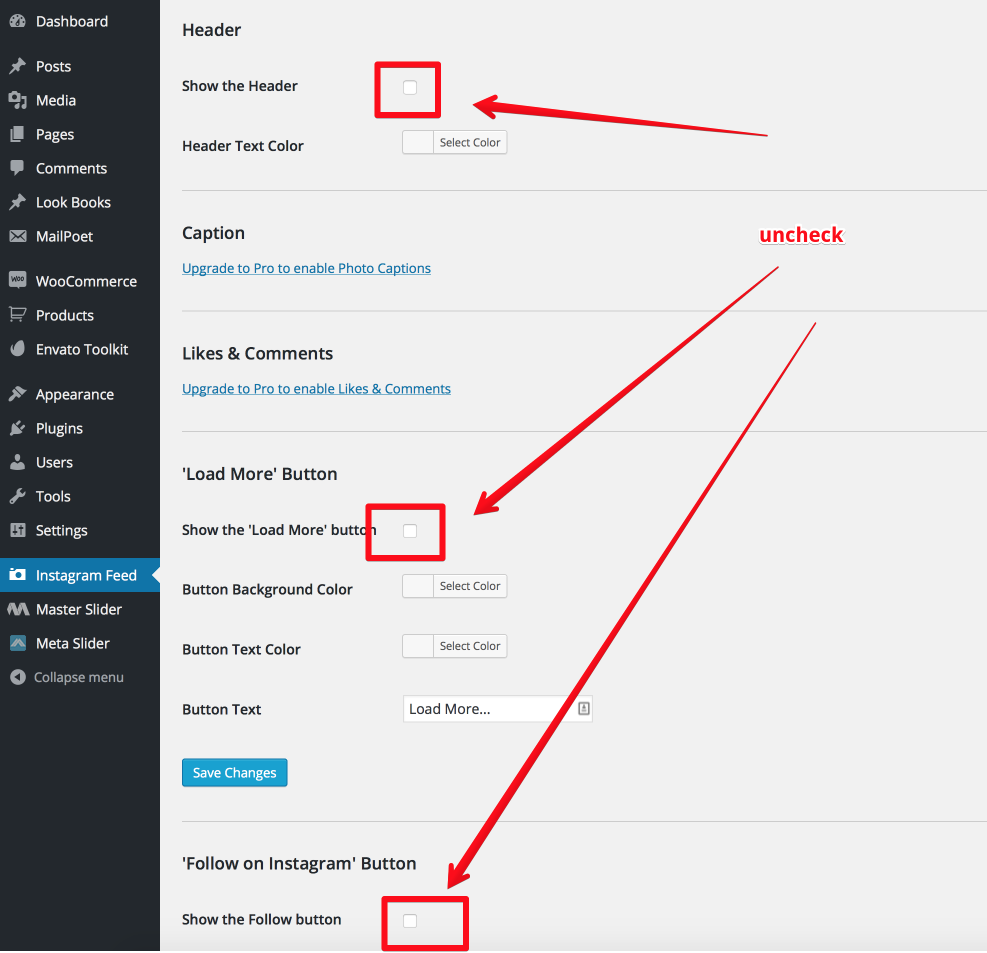
4. Display Instagram Feed
- Create a widget and display this widget at Blog Right Sidebar: Go 'Appearance > Widgets > Text Widget and add to "Blog Right Sidebar"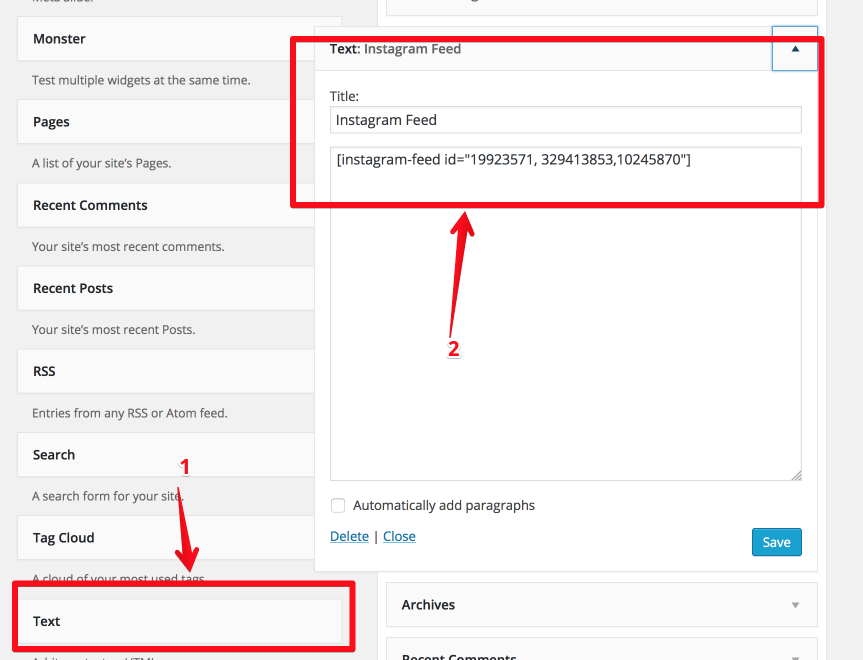
5. Result
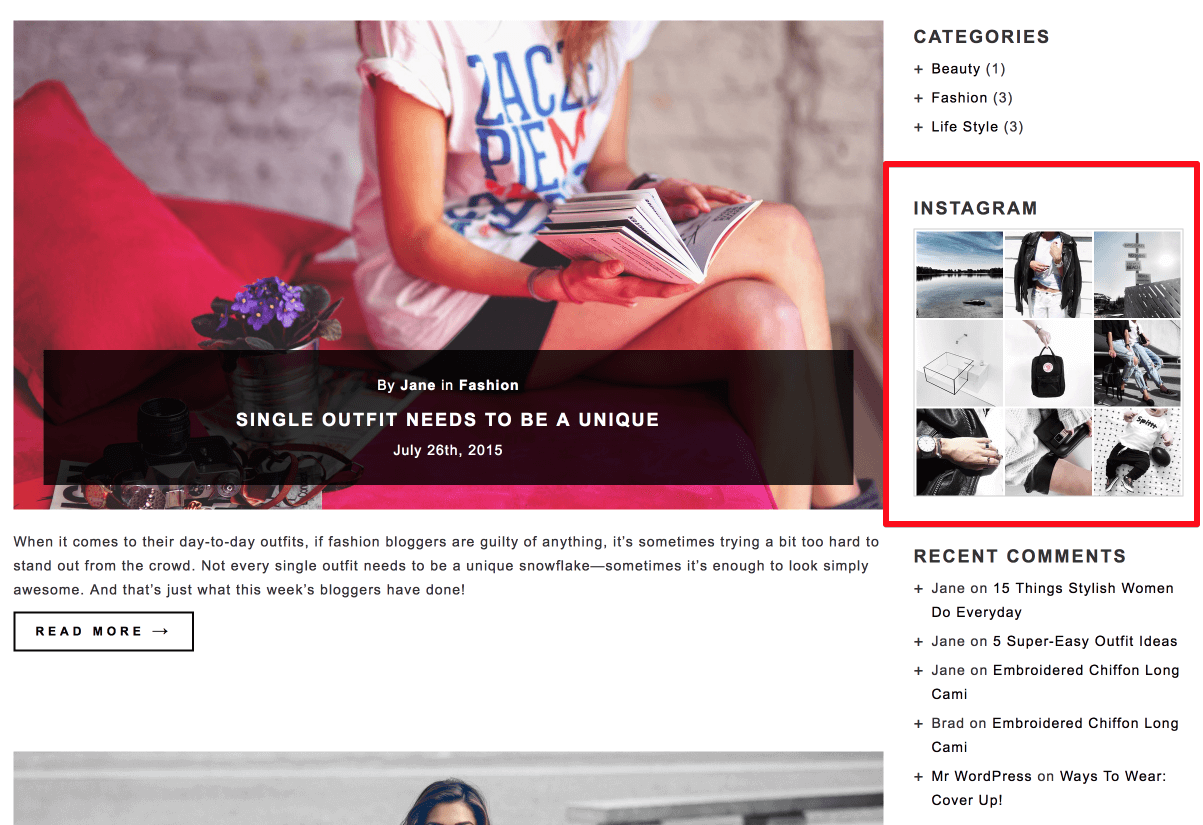
Meta Slider
1. You need to download install Instagram Feed plugin
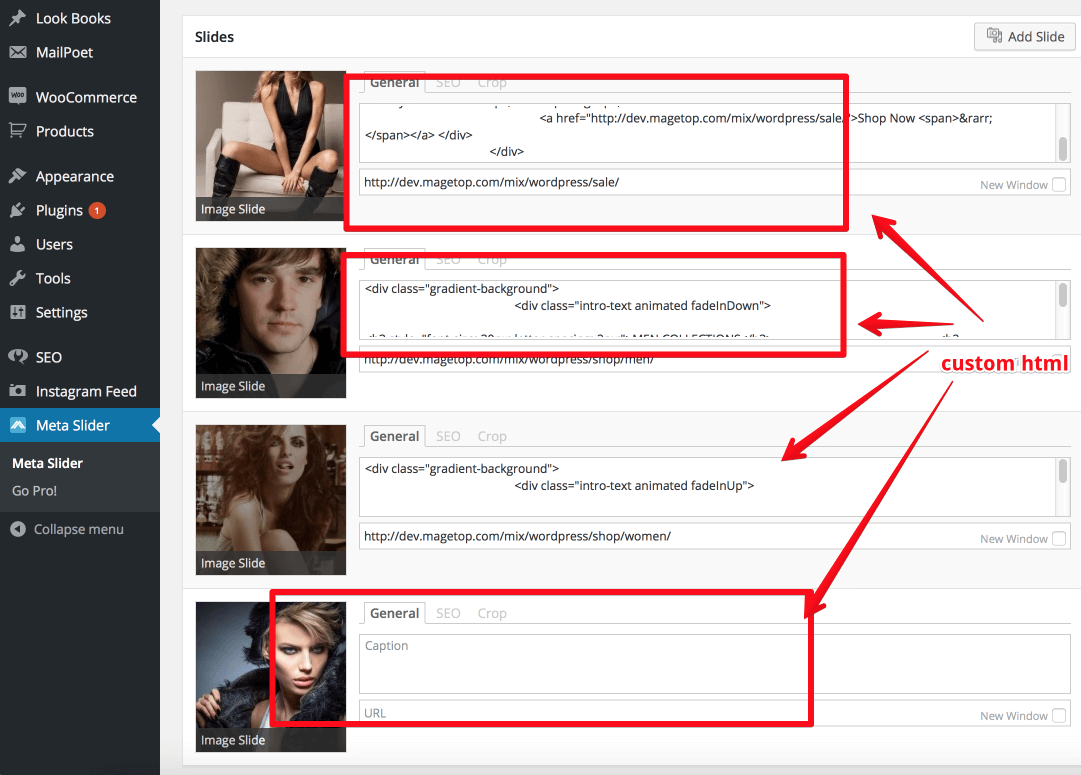
To create your first slider go 'Meta Slider > Meta Slider'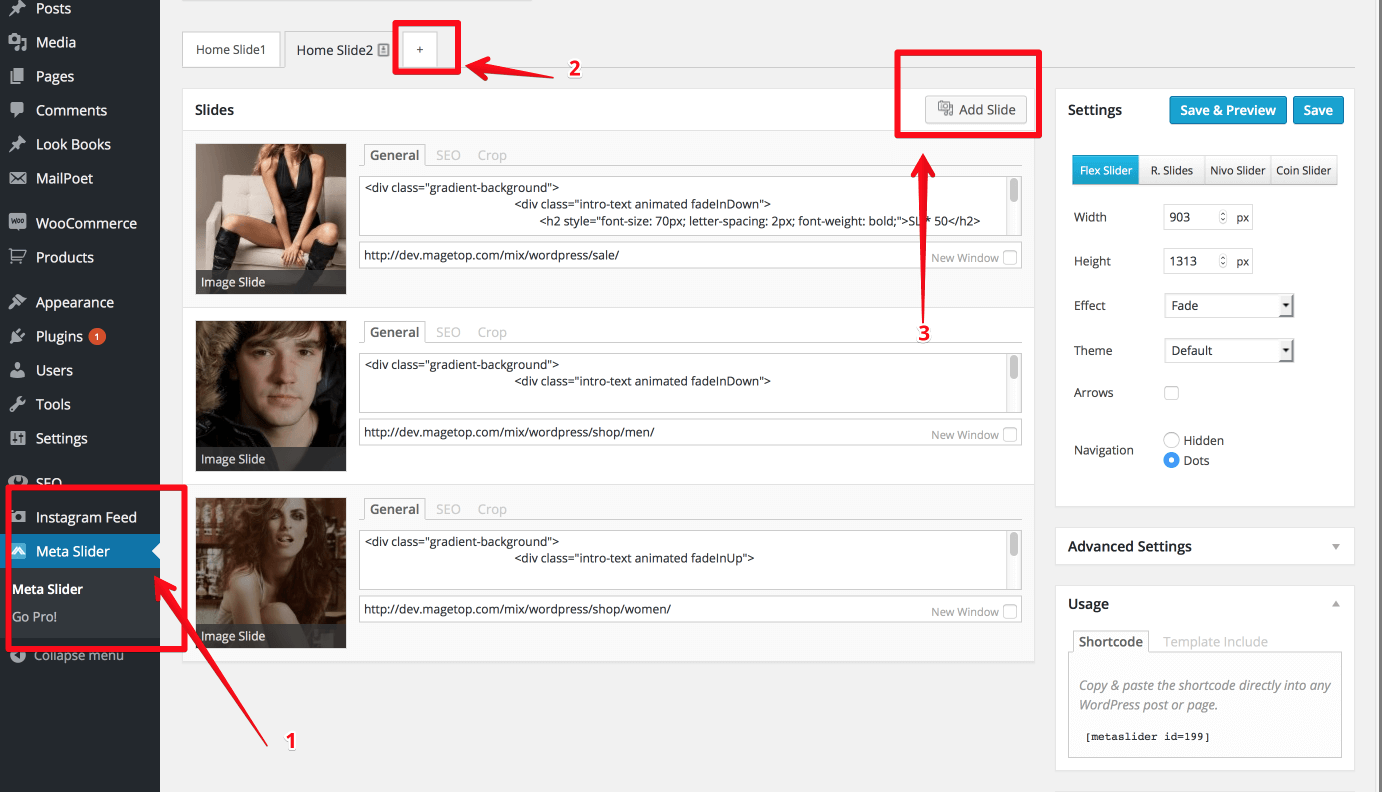
2. We're using free edition of Meta Slider so you want style text on slider you only have method: put custom HTML into caption box
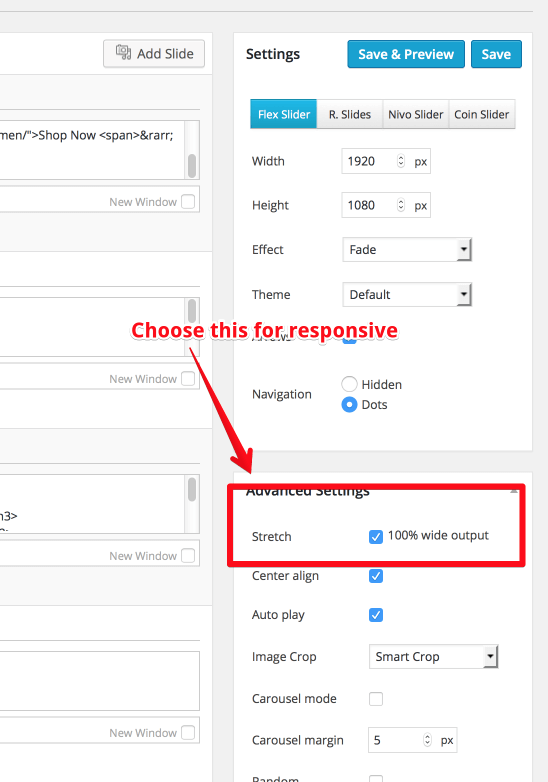
3. Choose kind of slider to display
- Flex Slider
- R.Slider
- Nivo Slider
- Coin Slider
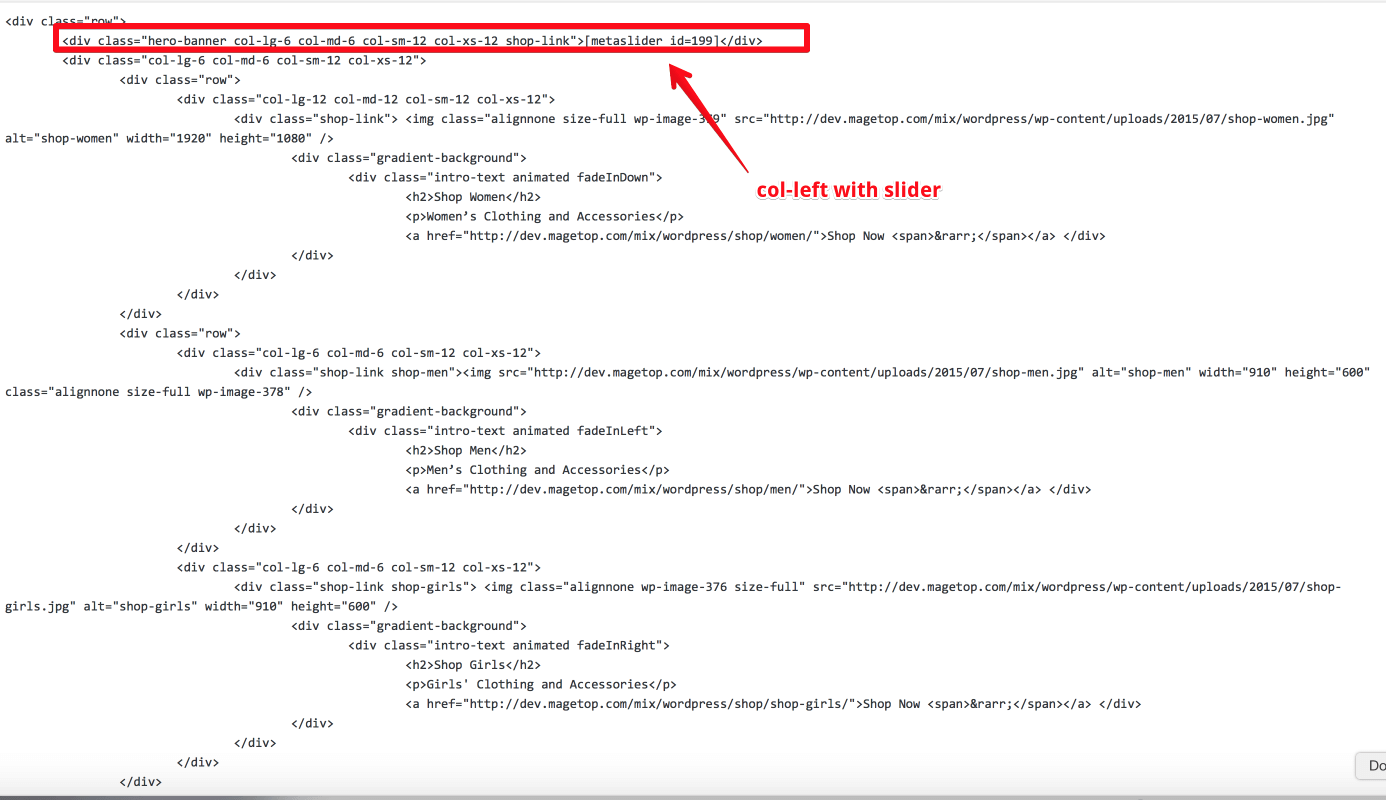
4. Display Slider
You can use shortcode and out to any where you want displayExample we use for homepage
5. Result


Contact Form 7
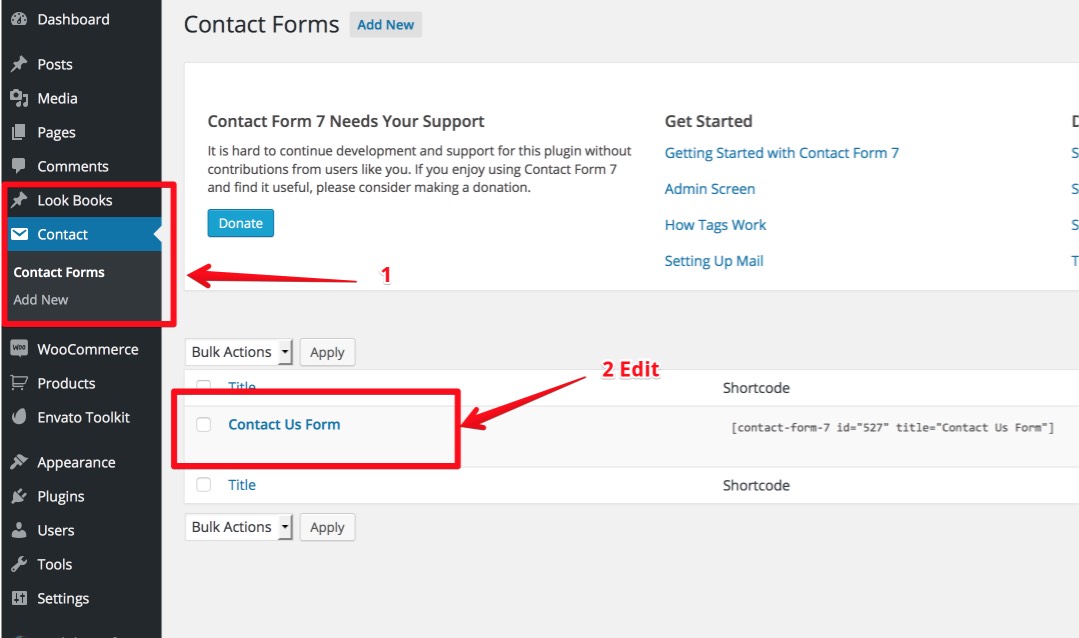
1. You need to download install Contact Form 7 plugin
2. Edit default form
3. Edit content of form
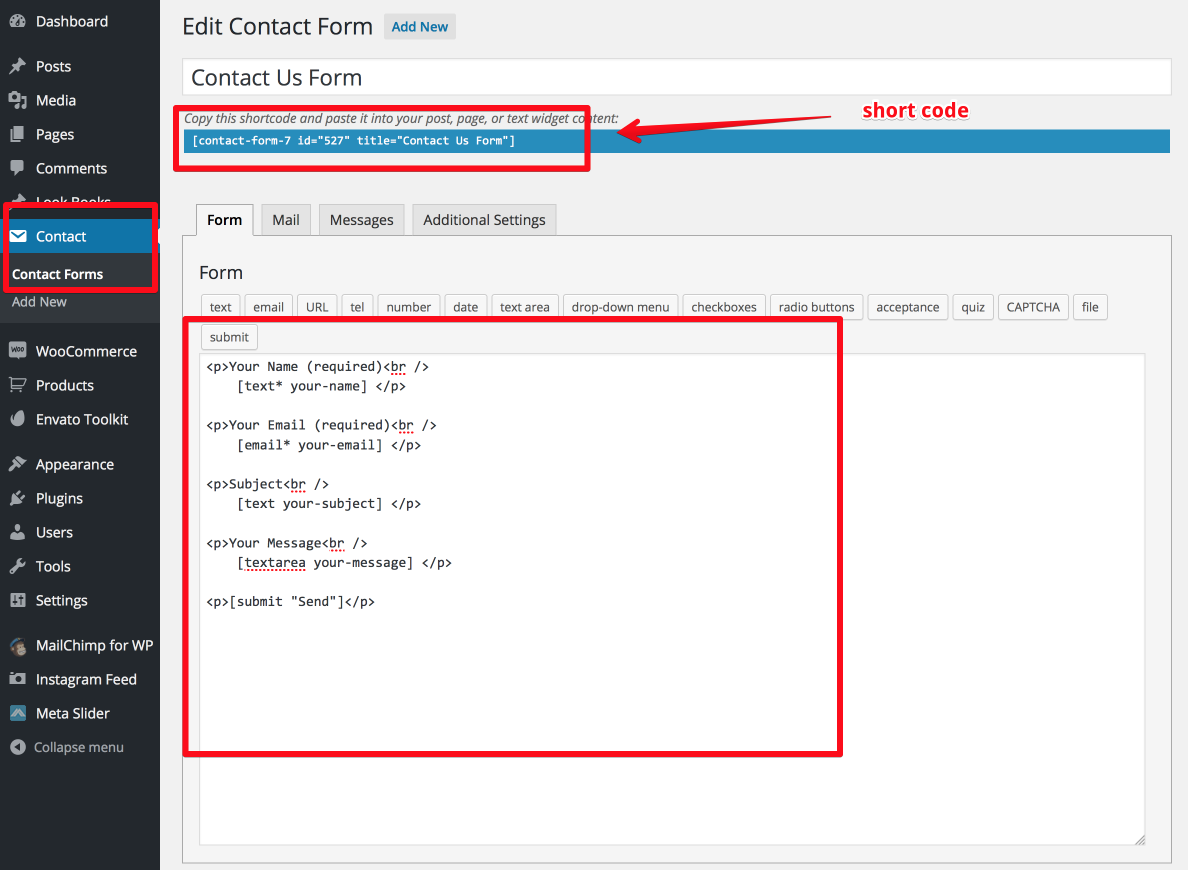
4. Display Contact Form 7 in contact page
- Create new page and put shortcode'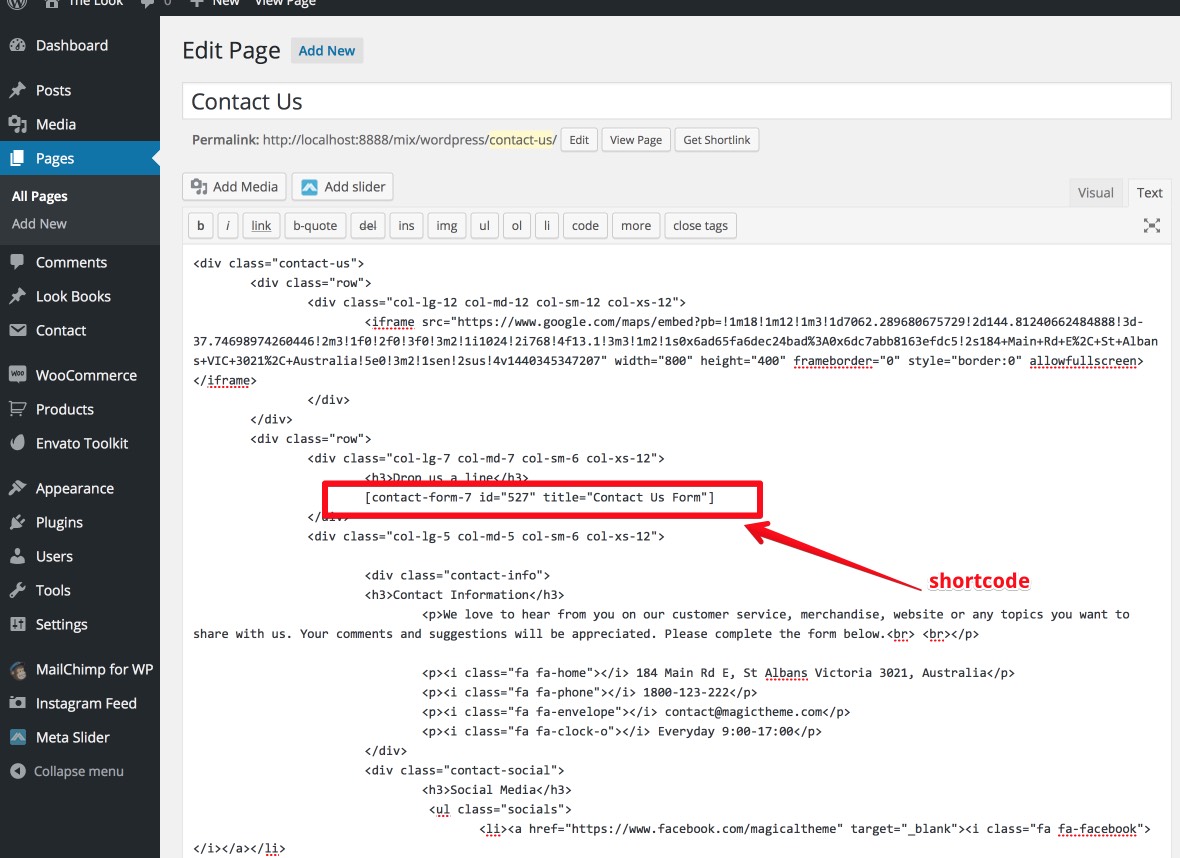
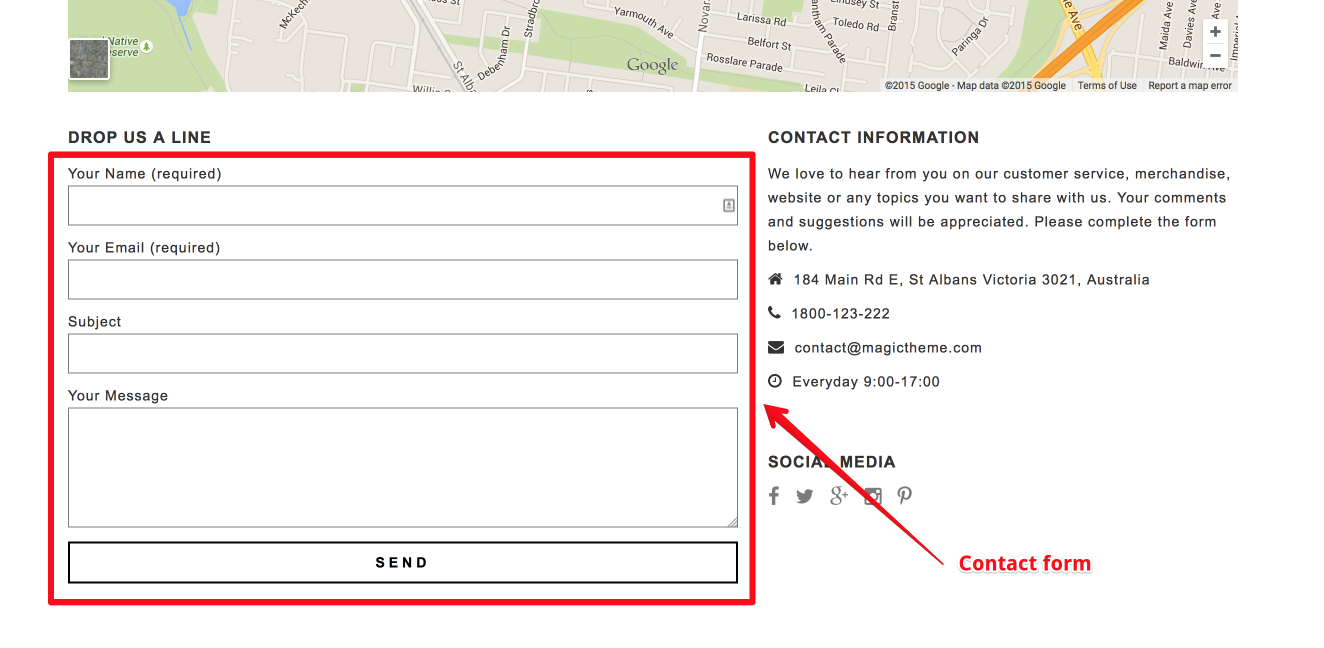
5. Result
YITH WooCommerce Popup
1. You need to download install YITH WooCommerce Newsletter Popupplugin
2. Create Popup
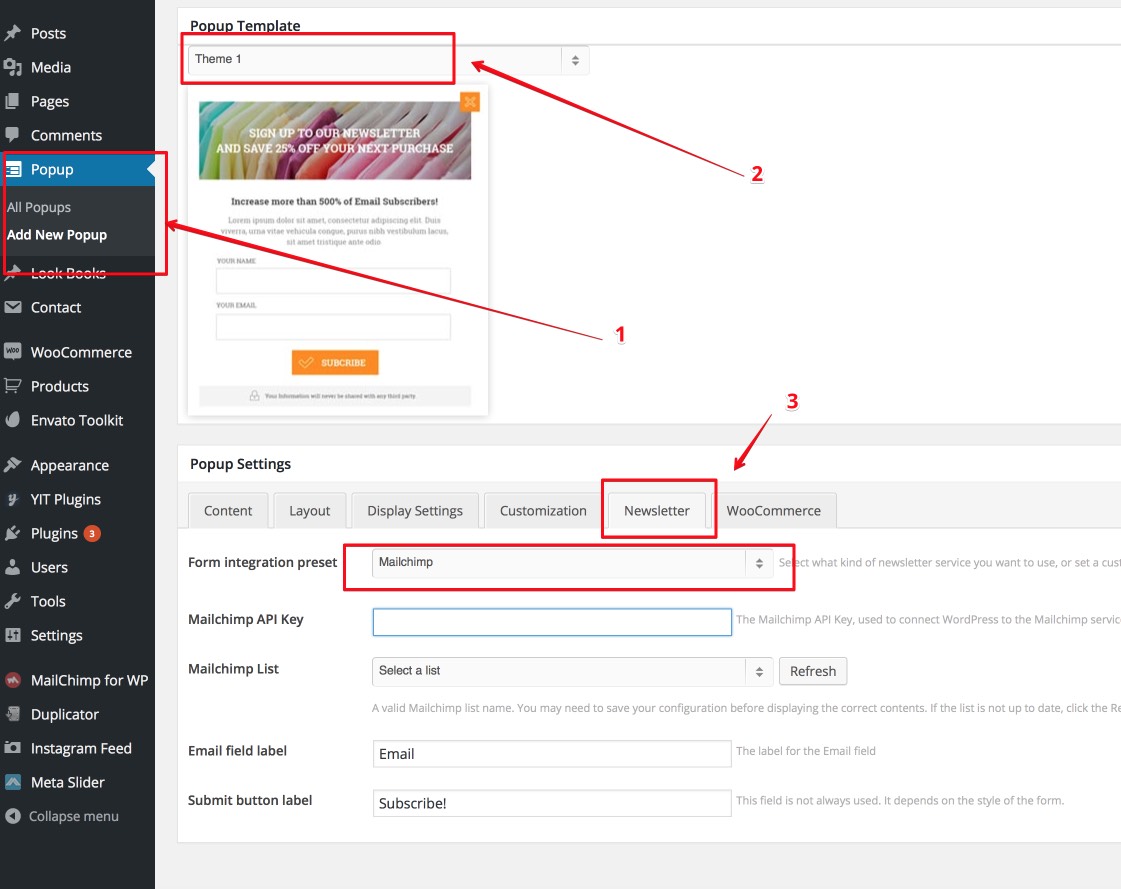
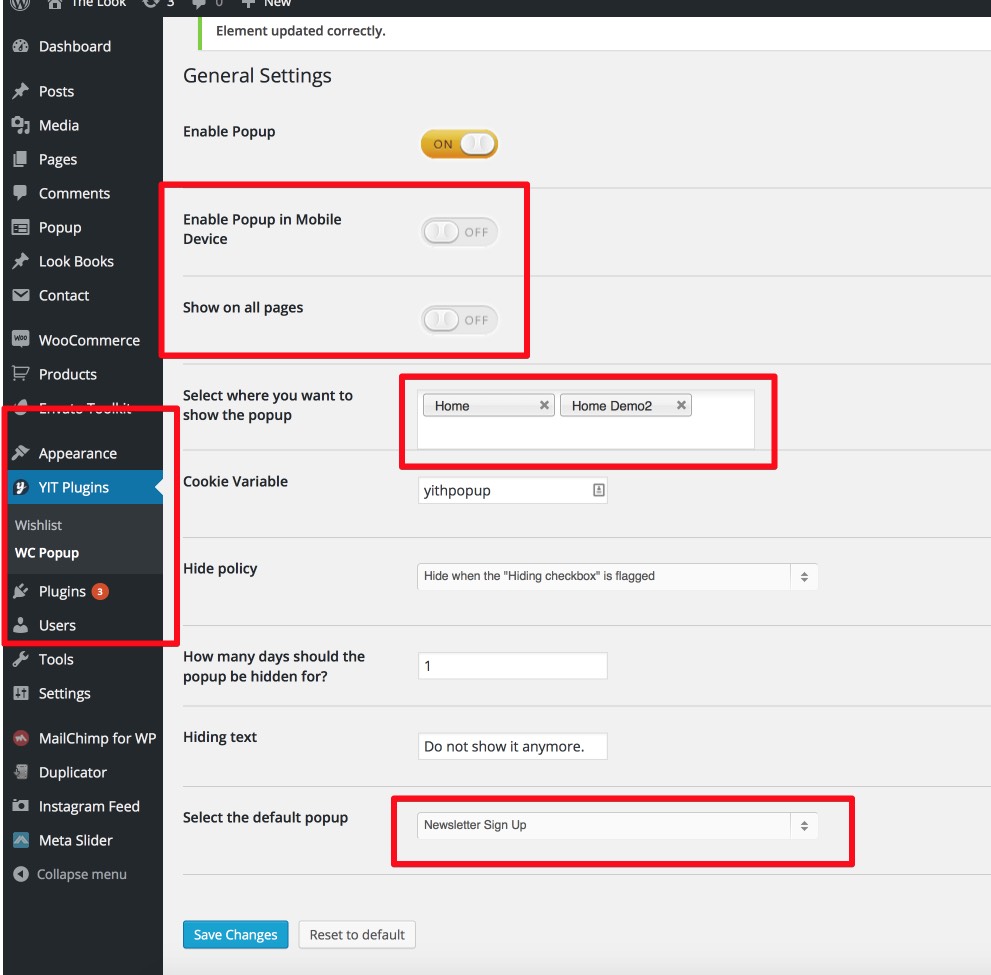
3. Setup Popup display on pages:
Socials Setting & Google Analytics
You can setting up your social channel link and add Google Analytics tracking code at 'Space Theme Options > Social Settings.